yucatio@システムエンジニア

趣味で作ったものいろいろ

JavaScriptで「○分前」「○時間前」「○日前」など現在時刻からのざっくりした時間経過を表示したい場合は、Moment.jsのfromNowを使う

やりたいこと

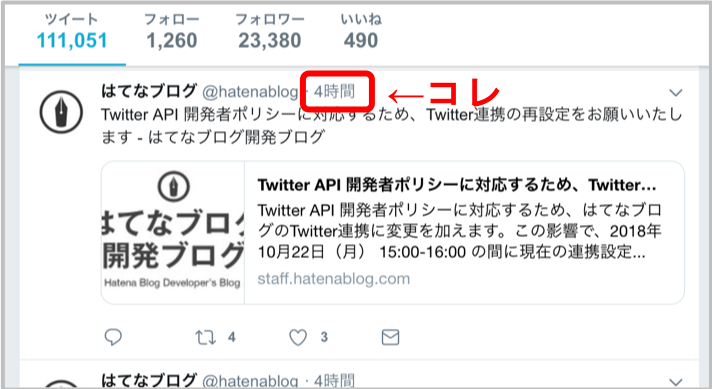
Twitterのように、投稿日付を表示したい。「○分前」「○時間前」「○日前」など、現在時刻からの経過時間をざっくり表示したい。
f:id:yucatio:20181019222047p:plain

moment.jsのfromNowでできる

moment.jsのfromNowを使えば実現できます。

Time from now

デフォルトの設定では以下のように表示されます。未来の日時の場合は、(“前”の部分が”後”になります)

範囲 Key(*1) 表示例
0 から 44 秒 s 数秒前
(ss から 44 秒(*2)) ss 44秒前
45 から 89 秒 m 1分前
90 秒 から 44 分 mm 2分前 ... 44分前
45 から 89 分 h 1時間前
90 分 から 21 時間 hh 2時間前 ... 21時間前
22 から 35 時間 d 1日前
36 時間 から 25 日 dd 2日前 ... 25日前
26 から 45 日 M 1ヶ月前
45 から 319 日 MM 2ヶ月前 ... 10ヶ月前
320 から 547 日 (1年半) y 1年前
548 日以上 yy 2年前 ... 20年前

(*1) Keyは、時間の丸めとなる閾値。例えば、Keyのmは45なので、45分以上は1時間と見なされます。

(*2) ssキーは、デフォルトでは44に設定されているため、”44秒前”のような表示はされません。ssの値を10にしたきには、1から10秒は”数秒前”、11から44秒は”○秒前”と表示されます。

momentjs.com/13-relative-time-threshold.md at master · moment/momentjs.com · GitHub

moment#fromNowを動かしてみる

環境の準備とmomentパッケージのインストール

yarn + ES 6 + React(create-react-app使用)を利用するので、それ以外の環境の場合は適宜読み替えてください。

# 新規プロジェクトの作成
$ yarn create react-app moment-fromnow
yarn create v1.9.4
# 中略
success Saved 10 new dependencies.
info Direct dependencies
├─ react-dom@16.5.2
├─ react-scripts@2.0.5
└─ react@16.5.2
# 中略
Success! Created moment-fromnow at /Users/yuka/react/moment-fromnow
# 後略

$ cd  moment-fromnow

# momentパッケージの追加
$ yarn add moment
# 中略
info All dependencies
├─ moment@2.22.2
├─ react-dom@16.5.2
└─ react@16.5.2

シンプルなコード

簡単なコードを動かしてみます。

src/App.js

import React from 'react';
import moment from 'moment'  // #1
import 'moment/locale/ja'  // #2

const App = () => (
  <div>
    {moment('2018-10-19 13:13:13').fromNow()}  // #3
  </div>
);

export default App;
  • momentをimportします(#1)。
  • moment/locale/jaをimportし、日本語化します(#2)。
  • moment('2018-10-19 13:13:13’)で、201年10月19日13時13分13秒を表すmomentオブジェクトを作成し、fromNow()を呼び出します(#3)。

実行結果

サーバを起動して確認します。

$ yarn start

http://localhost:3000 を開きます。

f:id:yucatio:20181019223439p:plain

無事表示されました。

様々な時刻でfromNowの実行結果を確認する

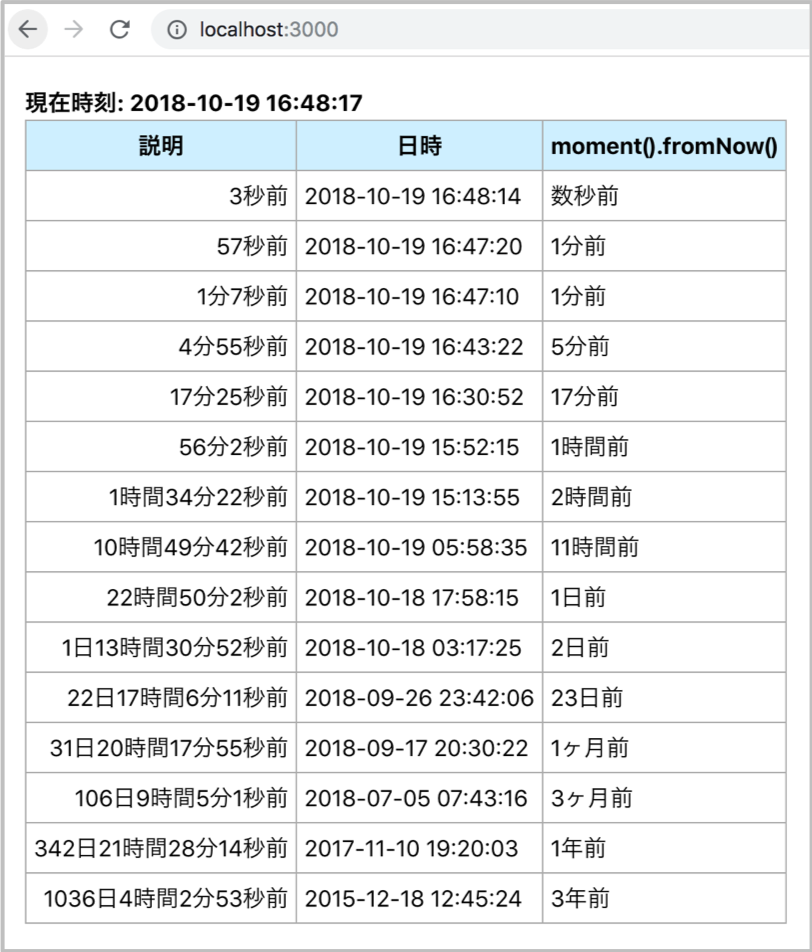
簡単な動作確認はできたので、一通り全ての範囲の表示を確認します。

src/App.js

import React from 'react';
import moment from 'moment'
import 'moment/locale/ja'
import './App.css';

const DATE_FORMAT = 'YYYY-MM-DD HH:mm:ss'

const App = () => {
  let now = moment();
  const timeAgoArr = [
    {description: '3秒前'              , timeAgo: moment(now).subtract(3, 'seconds')},
    {description: '57秒前'             , timeAgo: moment(now).subtract(57, 'seconds')},
    {description: '1分7秒前'            , timeAgo: moment(now).subtract(1, 'minutes').subtract(7, 'seconds')},
    {description: '4分55秒前'           , timeAgo: moment(now).subtract(4, 'minutes').subtract(55, 'seconds')},
    {description: '17分25秒前'          , timeAgo: moment(now).subtract(17, 'minutes').subtract(25, 'seconds')},
    {description: '56分2秒前'           , timeAgo: moment(now).subtract(56, 'minutes').subtract(2, 'seconds')},
    {description: '1時間34分22秒前'      , timeAgo: moment(now).subtract(1, 'hours').subtract(34, 'minutes').subtract(22, 'seconds')},
    {description: '10時間49分42秒前'     , timeAgo: moment(now).subtract(10, 'hours').subtract(49, 'minutes').subtract(42, 'seconds')},
    {description: '22時間50分2秒前'      , timeAgo: moment(now).subtract(22, 'hours').subtract(50, 'minutes').subtract(2, 'seconds')},
    {description: '1日13時間30分52秒前'  , timeAgo: moment(now).subtract(1, 'days').subtract(13, 'hours').subtract(30, 'minutes').subtract(52, 'seconds')},
    {description: '22日17時間6分11秒前'  , timeAgo: moment(now).subtract(22, 'days').subtract(17, 'hours').subtract(6, 'minutes').subtract(11, 'seconds')},
    {description: '31日20時間17分55秒前' , timeAgo: moment(now).subtract(31, 'days').subtract(20, 'hours').subtract(17, 'minutes').subtract(55, 'seconds')},
    {description: '106日9時間5分1秒前'   , timeAgo: moment(now).subtract(106, 'days').subtract(9, 'hours').subtract(5, 'minutes').subtract(1, 'seconds')},
    {description: '342日21時間28分14秒前', timeAgo: moment(now).subtract(342, 'days').subtract(21, 'hours').subtract(28, 'minutes').subtract(14, 'seconds')},
    {description: '1036日4時間2分53秒前' , timeAgo: moment(now).subtract(1036, 'days').subtract(4, 'hours').subtract(2, 'minutes').subtract(53, 'seconds')},
  ]
  return (
    <div className="fromNowTable">
      <div className="currentTime">現在時刻: {now.format(DATE_FORMAT)}</div>
      <table>
        <thead>
          <tr>
            <th>説明</th><th>日時</th><th>moment().fromNow()</th>
          </tr>
        </thead>
        <tbody>
          {timeAgoArr.map(({description, timeAgo}) => (
            <tr>
              <td className="description">{description}</td>
              <td>{timeAgo.format(DATE_FORMAT)}</td>
              <td>{timeAgo.fromNow()}</td>
            </tr>
          ))}
        </tbody>
      </table>
    </div>
  );
}

export default App;

実行結果

$ yarn start

http://localhost:3000 を開いて確認します。
f:id:yucatio:20181019223852p:plain

それぞれ”5分前”や”2時間前”、”23日前”など表示されることが確かめられました。

あとがき

Ruby on Railsのtime_ago_in_wordsを探していたのですが、全然見つからず苦労しました。危うく自分で実装するところでした。

ちなみにTwitterfacebookは24時間以内の投稿は、○[分/時間]前、それ以上前だと投稿した日付が表示されます。SNSなどはその方が良いかもしれませんね。

環境

関連記事

yucatio.hatenablog.com

react-router-domのインストールと設定 (STEP 3 : 他のユーザのタスクが見れるタスク管理アプリを作成する - React + Redux + Firebase チュートリアル)

★前回の記事

yucatio.hatenablog.com

ルーティングとreact-router-domとredux統合

アプリににルーティング機能を追加します。 reactにおけるルーティングと、なぜルーティングが必要なのかはこちらがわかりやすいです。

React Router v4 の基本的な考え方と使い方 - 30歳からのプログラミング

reactにおけるルーティングといえば、react-routerですが、version 4からコア機能のreact-routerとweb用のreact-router-dom、React Native用のreact-router-nativeに分かれたようなので、今回はweb用のreact-router-domを利用します。

reduxとreact-routerを統合するのには、react-router-reduxが有名ですが、2018年10月現在非推奨となっています。 また、react-routerの公式ページには、ルーティング情報をreduxのstoreに保存することは非推奨と書いてあります。

Redux Integration

今回はredux binding(redux統合)は使用せず、react-router-domのみ使用します。

今回の変更

  • ナビゲーション用のコンポーネントNavbarを追加します。
  • ルート要素が指定された場合は、Dashboardコンポーネントを描画します。
  • /todo/{ユーザID}/todosが指定された場合には、TodoComponentを描画します

f:id:yucatio:20181012224251p:plain

f:id:yucatio:20181012224304p:plain

react-router-domのインストール

$ yarn add react-router-dom

App.jsの書き換え

ルーティングをApp.jsに記載します。

src/components/App.js(コメントは消してからデプロイしてください)

import React from 'react'
import { BrowserRouter, Route, Switch } from 'react-router-dom'    // #1
import Login from './Login'
import Navbar from './Navbar'
import Dashboard from './Dashboard'
import TodoComponent from './TodoComponent'
import NoMatch from './NoMatch'

const App = () => (
  <BrowserRouter>  {/* #2 */}
    <div>
      <Login />  {/* #3 */}
      <Navbar />  {/* #3 */}
      <Switch>  {/* #4 */}
        <Route exact path="/" component={Dashboard} />  {/* #5 */}
        <Route exact path="/users/:uid/todos" component={TodoComponent} />  {/* #6 */}
        <Route component={NoMatch} />  {/* #7 */}
      </Switch>
    </div>
  </BrowserRouter>
)

export default App;
  • BrowserRouter, Route, Switchreact-router-domからimportします(#1)。
  • URLと同期させたいコンポーネントBrowserRouterで囲みます(#2)。
  • LoginNavbarは、すべてのAppコンポーネントで表示するので、Switchの外に書いておきます(#3)。
  • Switchは、配下のRoute要素で最初にマッチしたpathのコンポーネントを描画します(#4)。
  • /パスにマッチした場合は、Dashboradコンポーネントを描画します(#5)。exactを付けて、/だけにマッチするようにします。(exactがないと、/aaa/bbbなどにもマッチします。)
  • /users/:uid/todosにマッチした時に、TodoComponentを描画します(#6)。:uidの部分はパラメータになっており、/users/user_a/todosなどにマッチします。
  • path要素なしのRouteコンポーネントは、すべてのパスにマッチします(#7)。上記のどのパスにもマッチしなかった場合に、NoMatchコンポーネントが描画されます。

Navbar, Dashbord, NoMatchの実装

Navbar, Dashbord, NoMatchは、仮の実装しておきます。Navbar, Dashboardは後で実装します。

src/components/Navbar.js

import React from 'react'

const Navbar = () => (
  <div>Navbar</div>
)

export default Navbar;

src/components/Dashboard.js

import React from 'react'

const Dashboard = () => (
  <div>Dashbord</div>
)

export default Dashboard;

src/components/NoMatch.js

import React from 'react'

const NoMatch = () => (
  <div>Page Not Found</div>
)

export default NoMatch;

動作確認

http://localhost:3000 を表示します。

f:id:yucatio:20181012225211p:plain

Dashboardが表示されました

http://localhost:3000/users/aaaa/todos を表示します。

f:id:yucatio:20181012224951p:plain

タスク一覧が表示されました。まだログインしているユーザのタスクが表示されます。

http://localhost:3000/hoge/fuga を表示します。

f:id:yucatio:20181012225439p:plain

Page Not Foundが表示されました。

うまく動いていますね。

以上でreact-router-domのインストールと設定は終了です。

★次回の記事

yucatio.hatenablog.com

★目次

yucatio.hatenablog.com

データベースルールファイル(database.rules.json)の変更と反映 (STEP 3 : 他のユーザのタスクが見れるタスク管理アプリを作成する - React + Redux + Firebase チュートリアル)

★前回の記事

yucatio.hatenablog.com

データベースルールファイルを変更します。

todosのルール

STEP 3では他のユーザのタスクは見れるので、そのように変更します。

database.rules.json

{
  "rules": {
    "todos" : {
      "$uid": {
        ".read": true, // 変更
        // 後略
      }
    }
  }
}

recentUpdatedTodosのルール

/recentUpdatedTodosに最近更新されたタスクを保存するので、設定を追加します。

database.rules.json

{
  "rules": {
    // 中略
    "recentUpdatedTodos": {  // 追加
      ".read": true,
      ".write": false  // #1
    },
    "$other": { ".validate": false }
  }
}
  • recentUpdatedTodosには、Cloud Functionsからのみ書き込むので、書き込み権限はfalseになっています。

データベースルールのFirebaseへの反映

ファイルを保存して、ルールをFirebaseに反映します。

$ firebase deploy --only database

=== Deploying to 'todo-sample-xxxxx’…

i  deploying database
i  database: checking rules syntax...
✔  database: rules syntax for database todo-sample-xxxxx is valid
i  database: releasing rules...
✔  database: rules for database todo-sample-xxxxx released successfully

✔  Deploy complete!

Project Console: https://console.firebase.google.com/project/todo-sample-xxxxx/overview

反映されました。

★次回の記事

yucatio.hatenablog.com

★目次

yucatio.hatenablog.com

STEP 3での成果物 (STEP 3 : 他のユーザのタスクが見れるタスク管理アプリを作成する - React + Redux + Firebase チュートリアル)

★前回の記事

yucatio.hatenablog.com

STEP 3では、Cloud Functions for Firebaseを使用して、タスクの作成/更新があった時に、"最近の更新”に登録します。 ユーザは"最近の更新"から各ユーザのタスク一覧へジャンプすることができます。

f:id:yucatio:20181011124946p:plain

タスク一覧のURLは、/users/{ユーザID}/todosにするため、react-router-domを使用します。また、react-router-domをreduxと一緒に使うため、connected-react-routerを利用します。

f:id:yucatio:20181011125247p:plain

自分のタスクのみ編集できるように変更もします。

f:id:yucatio:20181011130157p:plain

"最近の更新”は、そのままだとどんどんデータが溜まってしまうので、Cloud Functionsを利用して適宜一定の数以下になるよう、古いデータを削除するようにします。

それでは、STEP 3のチュートリアルを始めましょう。

★次回の記事

yucatio.hatenablog.com

★目次

yucatio.hatenablog.com

Firebaseアプリの公開 (STEP 2 : ユーザ認証を行なって、自分だけが読み込めて書き込めるタスク管理アプリを作成する - React + Redux + Firebase チュートリアル)

★前回の記事

yucatio.hatenablog.com

アプリが完成したので、Firebaseにアプリを公開します。

ビルドします。

$ yarn run build

一旦ローカルで正常に動くか確認しましょう。

$ firebase serve

http://localhost:5000にアクセスして、動作確認しましょう。 確認が終わったら、Firebaseにデプロイします。

$ firebase deploy

=== Deploying to 'todo-sample-xxxxx’…

i  deploying database, hosting
i  database: checking rules syntax...
✔  database: rules syntax for database todo-sample-xxxxx is valid
i  hosting[todo-sample-xxxxx]: beginning deploy...
i  hosting[todo-sample-xxxxx]: found 7 files in build
✔  hosting[todo-sample-xxxxx]: file upload complete
i  database: releasing rules...
✔  database: rules for database todo-sample-xxxxx released successfully
i  hosting[todo-sample-xxxxx]: finalizing version...
✔  hosting[todo-sample-xxxxx]: version finalized
i  hosting[todo-sample-xxxxx]: releasing new version...
✔  hosting[todo-sample-xxxxx]: release complete

✔  Deploy complete!

Project Console: https://console.firebase.google.com/project/todo-sample-xxxxx/overview
Hosting URL: https://todo-sample-xxxxx.firebaseapp.com

無事デプロイできたので、https://todo-sample-xxxxx.firebaseapp.com にアクセスします。(todo-sample-xxxxは自身のプロジェクトIDに置き換えてください。)

f:id:yucatio:20181006220312p:plain

f:id:yucatio:20181004224928p:plain

アプリが公開できました!

Firebaseで公開されている内容が更新されていないようなら、 firebase.jsonの内容が正しいかどうか確認してください。以下の記事を参照してください。

yucatio.hatenablog.com

これでSTEP 2は終了です。おめでとうございます!STEP 3ではCloud Functions for Firebaseを利用します。

★次回の記事

yucatio.hatenablog.com

★目次

yucatio.hatenablog.com

データベースルールファイル(database.rules.json)の変更と反映 (STEP 2 : ユーザ認証を行なって、自分だけが読み込めて書き込めるタスク管理アプリを作成する - React + Redux + Firebase チュートリアル)

★前回の記事

yucatio.hatenablog.com

データベースルールファイル(database.rules.json)を変更します。

todosのルール

STEP 2で作成したアプリでは、ユーザは自分のタスクのみ見れて、自分のタスクにのみ書き込めるので、ルールをそのように変更します。

database.rules.json

{
  "rules": {
    "todos": {
      "$uid": {  // #1
        ".read": "$uid === auth.uid",  // #2
        ".write": "$uid === auth.uid",  // #3
        "$todoId": {  // #4
          ".validate": "newData.hasChildren(['text', 'completed'])",  // #5
          "text": {
            ".validate": "newData.isString()"  // #6
          },
          "completed": {
            ".validate": "newData.isBoolean()"  // #7
          },
          "$other": { ".validate": false }  // #8
        }
      }
    }
  }
}
  • todosの直下のパスを$uidという名前で取得できるようにします(#1)。
  • 読み取りは、$uidと、認証ユーザのuidが同一の場合のみ可能にします(#2)。
  • 書き込みは、$uidと、認証ユーザのuidが同一の場合のみ可能にします(#3)。
  • 各タスクのキーを$todoIdという名前にします(#4)。
  • $todoIdの直下のパスは、textcompletedが必須になるようにします(#5)。
  • textは文字列であるというvalidationを追加します(#6)。実際のプロダクションだと、文字の長さなども定義した方が良いですが、今回は割愛します。
  • completedは真偽値であるというvalidationを追加します(#7)。
  • textcompleted以外の値が入らないように、最後に"$other": { ".validate": false }を追加します(#8)。

usersのルール

usersのデータは今回は使用しないので、簡単に定義して起きます。

database.rules.json

{
  "rules": {
    // 中略
    "users": {
      "$uid": {  // #1
        ".read": true,  // #2
        ".write": "$uid === auth.uid"  // #3
      }
    },
    "$other": { ".validate": false }  // #4
  }
}
  • todosの方と同様に、users直下のパスを$uidで読み取れるようにします(#1)。
  • 読み取りはtrueにします(#2)。
  • 書き込みは、uidと、認証ユーザのuidが同一の場合のみ可能にします(#3)。
  • todosusers以外の名前で、このパスの下に新しいパスを作れないようにします(#4)。

データベースルールのFirebaseへの反映

ルールをFirebaseに反映します。

$ firebase deploy --only database

=== Deploying to 'todo-sample-xxxxx’…

i  deploying database
i  database: checking rules syntax...
✔  database: rules syntax for database todo-sample-xxxxx is valid
i  database: releasing rules...
✔  database: rules for database todo-sample-xxxxx released successfully

✔  Deploy complete!

Project Console: https://console.firebase.google.com/project/todo-sample-xxxxx/overview

反映されました。

★次回の記事

yucatio.hatenablog.com

★目次

yucatio.hatenablog.com

タスクの書き込みパスの変更 (STEP 2 : ユーザ認証を行なって、自分だけが読み込めて書き込めるタスク管理アプリを作成する - React + Redux + Firebase チュートリアル)

★前回の記事

yucatio.hatenablog.com

タスクの書き込みパスを変更します。

todo actionの変更

書き込みパスを、todos/からtodos/${uid}に変更します。念のため、uidが定義されていない時はエラーを出すようにします。

src/actions/index.js

export const NOT_AUTHENTICATED_ON_TODO_ACTION = 'NOT_AUTHENTICATED_ON_TODO_ACTION';  // 追加

src/actions/todoActions.js

import {ADD_TODO_REQUEST, ADD_TODO_SUCCESS, ADD_TODO_ERROR,
  TOGGLE_TODO_REQUEST, TOGGLE_TODO_SUCCESS, TOGGLE_TODO_ERROR,
  NOT_AUTHENTICATED_ON_TODO_ACTION}  //  追加
   from './'

// 中略

const notAuthenticatedOnTodoAction = () => ({
  type: NOT_AUTHENTICATED_ON_TODO_ACTION
})

export const addTodo = (uid, text) => {  // #1
  return (dispatch, getState, {getFirebase}) => {
    if (!uid) {  // #2
      dispatch(notAuthenticatedOnTodoAction());
      return;
    }
    dispatch(addTodoRequest());
    const firebase = getFirebase();
    firebase.push(`todos/${uid}`, {completed: false, text})   // #3
    // 中略
  }
}

export const toggleTodo = (uid, id) => {  // #4
  return (dispatch, getState, {getFirebase}) => {
    if (!uid) {  // #5
      dispatch(notAuthenticatedOnTodoAction());
      return;
    }
    const firebase = getFirebase();
    const state = getState();
    const todo = state.firebase.data.todos[uid][id];  // #6
    dispatch(toggleTodoRequest(todo.text, !todo.completed));
    firebase.update(`todos/${uid}/${id}`, {completed: ! todo.completed})  // #7
    // 中略
  }
}
  • addTodoの引数にuidを追加します(#1)。
  • uidが未定義などの場合、エラーを画面に表示するように、dispatchします(#2, #5)。
  • 書き込みパスをtodos/${uid}に変更します(#3)。
  • toggleTodoの引数にuidを追加します(#4)。
  • 選択したtodoのデータの保存場所を変更します(#6)。
  • 書き込みを行うパスを、todos/${id}から、todos/${uid}/${id}に変更します(#7)。

reducerの変更

NOT_AUTHENTICATED_ON_TODO_ACTIONに対応するコードを追加します。

src/reducers/todos.js

import {ADD_TODO_REQUEST, ADD_TODO_SUCCESS, ADD_TODO_ERROR,
  TOGGLE_TODO_REQUEST, TOGGLE_TODO_SUCCESS, TOGGLE_TODO_ERROR,
  NOT_AUTHENTICATED_ON_TODO_ACTION}  // 追加
   from '../actions/'

// 中略

const todos = (state = {}, action) => {
  switch (action.type) {
    // 中略
    case NOT_AUTHENTICATED_ON_TODO_ACTION :  // 追加
      return {...state, notice: 'タスクを追加・変更するにはログインしてください'}
    // 中略
  }
}

componentの変更

actionにuidを渡すように、componentを変更します。

src/components/TodoComponent

let TodoComponent = ({uid, authenticating, authenticated}) => {
  // 中略
  return (
    <div>
      <AddTodo uid={uid} />  {/* #1 */}
      <NoticeForTodo />
      <VisibleTodoList uid={uid} />
      <Footer />
    </div>
  )
}
  • AddTodouidを渡します(#1)。

src/containers/AddTodo.js

// 前略
import PropTypes from 'prop-types'  // #1

let AddTodo = ({ uid, dispatch }) => {  // #2
  // 中略
  return (
    <div>
      <form
        onSubmit={ e => {
          // 中略
          dispatch(addTodo(uid, input.value))  // #3
          // 中略
        }}
      >
  // 中略
}

AddTodo.propTypes = {  // #4
  uid: PropTypes.string.isRequired,
}
  • PropTypesをimportします(#1)。
  • AddTodoコンポーネントの引数に、uidを追加します(#2)。
  • addTodoの引数にuidを追加します(#3)。
  • uidに対するpropTypesを設定します(#4)。

src/visibleTodoList.js

const mapDispatchToProps = (dispatch, {uid}) => {  // #1
  return {
    onTodoClick: (id) => {
      dispatch(toggleTodo(uid, id))  // #2
    }
  }
}
  • ownPropsからuidを受け取ります(#1)。
  • toggleTodoの引数にuidを追加します(#2)。

動作確認

ログインします。

f:id:yucatio:20181003115453p:plain

タスクを追加します。

f:id:yucatio:20181004151052p:plain

追加できました。

タスクをさらに追加して、タスク完了フラグを切り替えます。

f:id:yucatio:20181004224626p:plain

うまく動きました。

ログアウトしてから、別ユーザでログインします。

f:id:yucatio:20181004224422p:plain

f:id:yucatio:20181004224928p:plain

タスク追加、タスク完了フラグの切り替えが動作しました。

データベースも確認します。

f:id:yucatio:20181004225938p:plain

ユーザごとにタスクが作成されています。STEP 1で作成したタスクは削除してしまいましょう。

以上でユーザ認証を行なって、自分だけが読み込めて書き込めるタスク管理アプリが完成しました!おめでとうございます!

★次回の記事

yucatio.hatenablog.com

★目次

yucatio.hatenablog.com