yucatio@システムエンジニア

趣味で作ったものいろいろ

Material-UIのアイコンの色の変え方

Material-UI公式ページにSVGアイコンの色の変え方が載っています。

material-ui.com

color属性

テーマカラーの色を使用する場合には、color属性を使用します。

  • ’inherit'
  • 'primary'
  • 'secondary'
  • 'action'
  • 'error'
  • 'disabled’

のうち1つを指定することで色を変えられます。デフォルトは’inherit’です。

使用例

デフォルトの色を使用する↓

import { Done } from '@material-ui/icons'

// 略

<Done />

f:id:yucatio:20181123221136p:plain

<Done>は、オレンジ色の枠で囲った中の左側で、チェックのマークです。 ListItemIconのデフォルトの色になっています。

secondaryの色を使用する↓

import { Done } from '@material-ui/icons'

// 略

<Done color='secondary' />

f:id:yucatio:20181123221149p:plain

チェックマークが青色(secondaryの色)になりました。

nativeColor属性

テーマ以外の色を使用する場合にはnativeColor属性を使用します。

使用例

import green from '@material-ui/core/colors/green'
import { Done } from '@material-ui/icons'

// 略

<Done nativeColor={green[500]} />

f:id:yucatio:20181123221202p:plain

チェックマークが緑色になりました。チェックマークといえば緑色ですね。

バージョン

  • react: 16.5.0
  • @material-ui/core: 3.4.0
  • @material-ui/icons: 3.0.1

Material-UIでprimaryとsecondaryの色を変更する

Material-UIのprimaryとsecondaryの色の変え方がわからなかったのでメモ。

デフォルトの色

デフォルトでは、primaryはindigo, secondaryはpinkです。

f:id:yucatio:20181122230807p:plain

primaryとsecondaryの色を変更する

primaryとsecondaryの色を自分の好きな色に変えていきます。

1. 色を決める

今回はマテリアルデザインチームのカラーツールを使用します。

material.io

primaryとsecondaryの色を選択します。選択すると左側の画面にすぐに反映されるので、適用イメージを確かめならが選べます。 選択した色のカラーコードが右下に表示されます。

f:id:yucatio:20181122231844p:plain

2. createMuiThemeでテーマを作成する

ファイルを新規作成して色を記述します。paletteにカラーツールに表示されているカラーコードをコピーします。

createMuiTheme()で新しいテーマを作成しています。

src/materialui/theme.js

import {createMuiTheme} from '@material-ui/core/styles'

export const theme = createMuiTheme({
  palette: {
    primary: {
      light: '#ffff8b',
      main: '#ffee58',
      dark: '#c9bc1f',
      contrastText: '#000000',
    },
    secondary: {
      light: '#63a4ff',
      main: '#1976d2',
      dark: '#004ba0',
      contrastText: '#ffffff',
    },
  },
})

3. MuiThemeProviderでテーマを適用する

上記で作成したテーマを適用します。Reactツリーのルート要素を<MuiThemeProvider>で囲みます。

src/index.js

// 前略
import {MuiThemeProvider} from '@material-ui/core/styles'
import {theme} from './materialui/theme'

const store = createStore(todoApp)

render (
  <MuiThemeProvider theme={theme}>
    <Provider store={store}>
      <App />
    </Provider>
  </MuiThemeProvider>,
  document.getElementById('root')
)

実行結果

primary, secondaryの色が反映されました。(左上ロゴ部分は手動で変更しています)

f:id:yucatio:20181122232424p:plain

バージョン

  • react: 16.5.0
  • @material-ui/core: 3.4.0

参考

ReactでinputRef使用時、参照を保持する変数がundefinedになった原因と対処法

ReactでinputRef使用時、参照を保持する変数がundefinedになり、エラーが発生しました。その原因と対処法を紹介します。

先に結論

参照を保持する変数は、ローカル変数でなく、インスタンス変数にします。インスタンス変数はReact.Componentを拡張したクラスで使用できます(関数コンポーネントでは使用できません)。

良い例

import TextField from '@material-ui/core/TextField'

class AddTodo extends React.Component {
  render() {
    return (
      <TextField
        inputRef={node => {
          this.inputElement = node
        }}
      />
    )
  }
}

よくない例

import TextField from '@material-ui/core/TextField'

const AddTodo = ({uid, dispatch}) => {
  let input;

  // 略
  return (
    <TextField
      inputRef={node => {
        input = node
      }}
    />
  )
}

エラーが発生するコード

以下のコードは、Redux公式に載っているreact-reduxのサンプルを変更したものです。

propsにuid(ユーザID)とsending(送信中を表す真偽値)を追加しています。 Material-UIを利用し、 <input><TextField><button><Button>に変更しています。sendingtrue(データを送信中)の時は、<TextField><Button>をdisabledにしています。<TextField>のrefをinputRefに変更した理由については以下のリンクをご覧ください。

yucatio.hatenablog.com

src/AddTodo.js

import Button from '@material-ui/core/Button'
import TextField from '@material-ui/core/TextField'
// 他のimportは略

const AddTodo = ({uid, sending, dispatch}) => {
  let input;

  return (
    <div>
      <form
        onSubmit={ e => {
          e.preventDefault()
          if (!input.value.trim()) {
            return
          }
          dispatch(addTodo(uid, input.value))
          input.value = ''
        }}
      >
        <TextField
          inputRef={node => {
            input = node
          }}
          disabled={sending}
        />
        {' '}
        <Button variant="contained" type="submit" disabled={sending}>
          タスクを追加
        </Button>
      </form>
    </div>
  )
}

// 以下略

動作イメージ

テキストフィールドに文字列を入力して、タスクを追加ボタンを押します。

f:id:yucatio:20181118232815p:plain

サーバにデータにデータを送信中は上記コードのsendingtrueになり、テキストフィールドとボタンが操作できなくなります。

f:id:yucatio:20181118232833p:plain

サーバへのデータ送信が完了すると、sendingfalseになり、入力が可能になります。

f:id:yucatio:20181118232847p:plain

エラー再現手順

  1. ページを表示する
  2. タスクを追加する
  3. 再びタスクを追加する

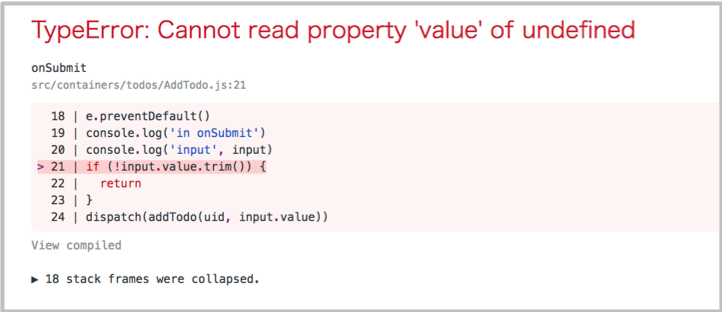
2回目のタスク追加で、以下のようなエラーが表示されます。inputの値がundefinedになっています。

TypeError: Cannot read property 'value' of undefined
f:id:yucatio:20181118233211p:plain

原因究明

確認のためのログを追記してもう一度実行します。

src/AddTodo.js

// 前略

const AddTodo = ({uid, sending, dispatch}) => {
  console.log('render')  // 追加
  let input;
  console.log('input', input)  // 追加
  console.log('sending', sending)  // 追加

  return (
    <div>
      <form
        onSubmit={ e => {
          e.preventDefault()
          console.log('in onSubmit')  // 追加
          console.log('input', input)  // 追加
          if (!input.value.trim()) {
            return
          }
          dispatch(addTodo(uid, input.value))
          input.value = ''
        }}
      >
        <TextField
          inputRef={node => {
            console.log('in inputRef callback')  // 追加
            input = node
            console.log('input', input)  // 追加
          }}
          disabled={sending}
        />
        {' '}
        <Button variant="contained" type="submit" disabled={sending}>
          タスクを追加
        </Button>
      </form>
    </div>
  )
}

// 後略

再びエラー再現

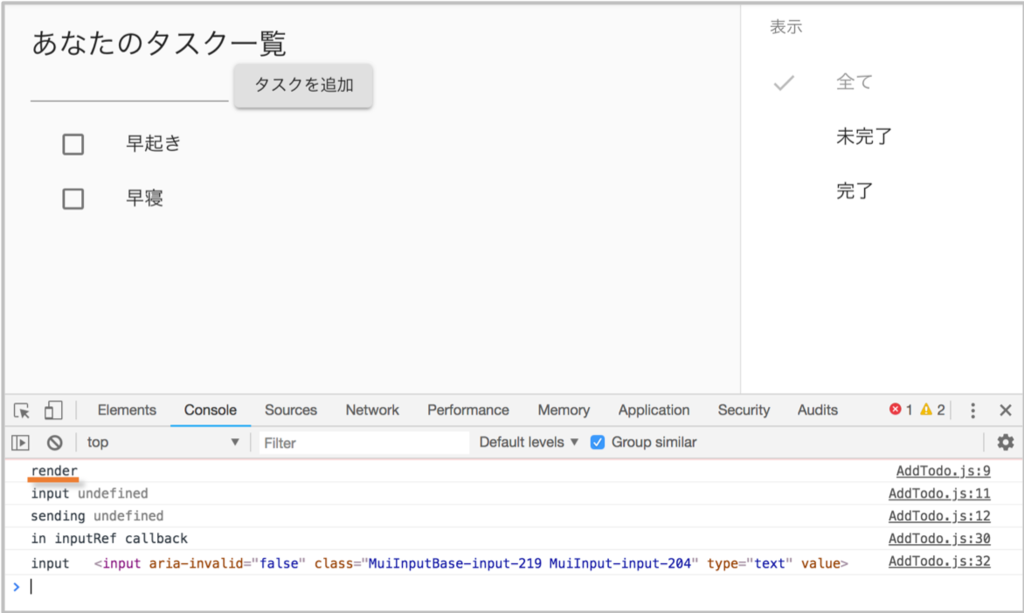
1. ページを表示する

renderが呼ばれ、refコールバックが呼ばれます。input変数は、宣言直下ではundefinedですが、refコールバック内でnodeがセットされます。
f:id:yucatio:20181118234857p:plain

2. タスクを追加する

sendingの値が変化したので、renderが呼ばれ、input変数が再びundefinedに変更されます。この時refコールバックは呼ばれません。ここがバグの原因のようです。

f:id:yucatio:20181118234913p:plain

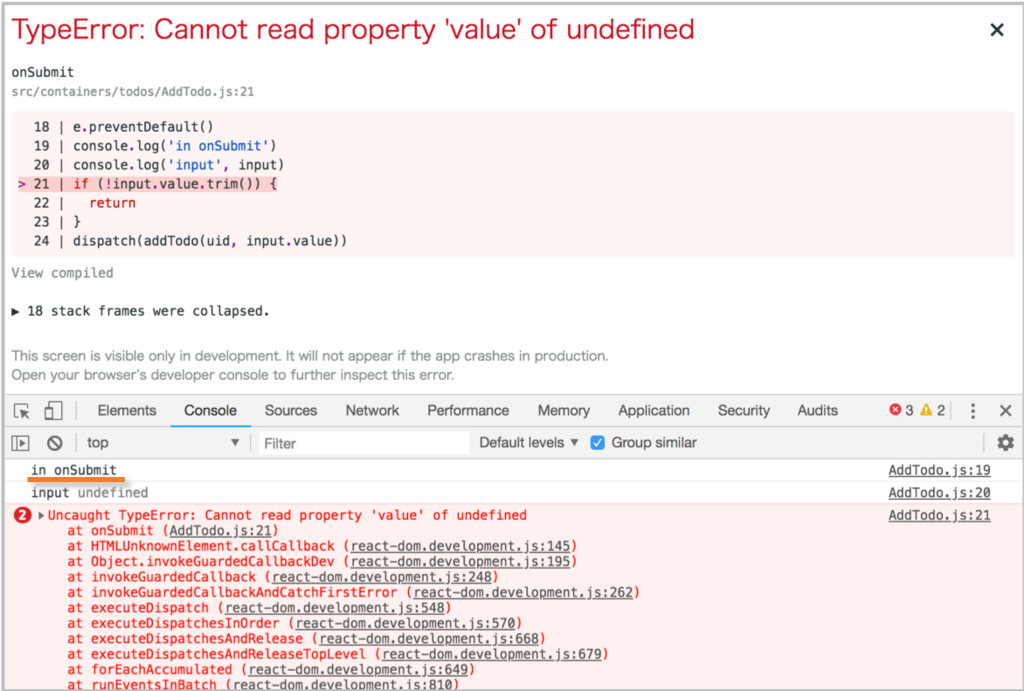
3. 再びタスクを追加する

エラーが表示されました。onSubmit中でもinputは undefinedのままです。
f:id:yucatio:20181118234930p:plain

修正

Reactの公式サンプル (Refs and the DOM – React) にあるように、参照を保持する変数をインスタンス変数 (this.inputElement)に変更します。

インスタンス変数を使用するために、関数コンポーネントからReact. Componentを拡張したクラスに変更します。

// 前略

class AddTodo extends React.Component {  // 変更
  render() {  // 変更
    const {uid, sending, dispatch} = this.props  // 変更

    return (
      <div>
        <form
          onSubmit={ e => {
            e.preventDefault()
            if (!this.inputElement.value.trim()) {  // 変更
              return
            }
            dispatch(addTodo(uid, this.inputElement.value))  // 変更
            this.inputElement.value = ''  // 変更
          }}
        >
          <TextField
            inputRef={node => {
              this.inputElement = node  // 変更
            }}
            disabled={sending}
          />
          {' '}
          <Button variant="contained" type="submit" disabled={sending}>
            タスクを追加
          </Button>
        </form>
      </div>
    )
  }
}

// 後略

動作確認

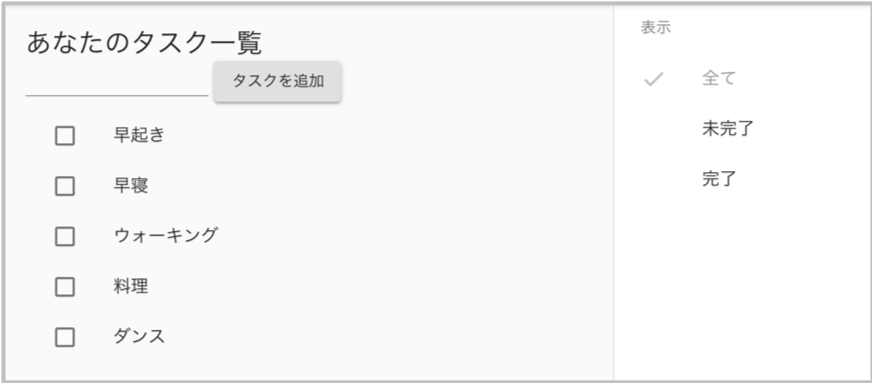
  1. ページを表示する
  2. タスクを追加する
  3. 再びタスクを追加する

2回目のタスク追加でもエラーなくタスクを追加できました。
f:id:yucatio:20181118235656p:plain

<input>がrender内に書いてある場合

Redux公式のコードでは、<input>がAddTodoのrender内に書いてあります。このように書いてあると、AddTodoのrenderが呼ばれるたびにrefコールバックが実行されます。そのため、2回目以降もinput変数に値が入っている状態になり、エラーにはなりません。しかし、TextFieldに変更すると初回のしかrefコールバックが実行されないため、エラーになってしまいました。

あとがき

2回目のタスク追加でエラーになるとは予想外でした。見つけにくいバグなので2回連続でタスク追加するパターンをテストケースに追加しようと思いました。

バージョン

  • react : 16.5.0
  • @material-ui/core : 3.4.0

Material-UIのTextFieldでrefを使う

TextFieldでrefを使う

Material-UI導入時、inputをTextFieldに置き換える時に、多くの属性は<input><TextField>に置き換えた際そのままでよいのですが、refはそのままにすると動きません。refinputRefに変更する必要があります。

変更前

const AddTodo = ({dispatch}) => {
  let input;

  // 略
  return (
    <input
      ref={node => {
        input = node
      }}
    />
  )
}

変更後

import TextField from '@material-ui/core/TextField'

class AddTodo extends React.Component {
  render() {
    return (
      <TextField
        inputRef={node => {
          this.inputElement = node
        }}
      />
    )
  }
}

<TextField><input>そのものではないので、TextFieldにrefを指定しても動きません。代わりに、inputRefプロパティを渡して、(TextFieldから子孫コンポーネンントにバケツリレーして、)<input ref={props.inputRef}>としてrefを設定します。

同様に、inputにプロパティ(readonlyやstepなど)を渡す場合にも、inputPropsにオブジェクトを渡します。

関数コンポーネントからクラスに変更した理由と、node => { this.inputElement = node}に変更した理由はこちらの記事を参照してください。

yucatio.hatenablog.com

refの使用

inputRefの使用については、 React公式ページの例がわかりやすいと思います。

Callback Refs

You can pass callback refs between components like you can with object refs that were created with React.createRef().

function CustomTextInput(props) {
  return (
    <div>
      <input ref={props.inputRef} />
    </div>
  );
}

class Parent extends React.Component {
  render() {
    return (
      <CustomTextInput
        inputRef={el => this.inputElement = el}
      />
    );
  }
}

In the example above, Parent passes its ref callback as an inputRef prop to the CustomTextInput, and the CustomTextInput passes the same function as a special ref attribute to the <input>. As a result, this.inputElement in Parent will be set to the DOM node corresponding to the <input> element in the CustomTextInput.

Refs and the DOM – React

"React.createdRef()でrefを作成したのと同じように、コンポーネント間でコールバックrefを渡すことができます。

上記の例では、親コンポーネントはCustomTextInputにrefコールバックをinputRefプロパティとして渡し、CustomTextInputはinputRefで受け取った関数を<input>のref属性に設定しています。そのため、親コンポーネントのthis.inputElementはCustomTextInputの<input>のDOMノードが設定されることになります。"

あとがき

refが何であるかきちんと理解しないままinputをTextFieldに置き換えていたので、ハマりました。公式ドキュメント(Refs and the DOM – React) を読んでrefの理解が深まりました。

バージョン

  • @material-ui/core: 3.4.0

react-redux-firebaseで、pushの自動生成key(ID)を事前に取得

firebaseでpushのkeyを事前取得

firebaseの公式サイトには、key(ID)の取得は以下のように書いてあります。

// Get a key for a new Post.
var newPostKey = firebase.database().ref().child('posts').push().key;

react-redux-firebaseでも同様に、

const firebase = getFirebase();
const id = firebase.push('path/to/data').key

でkey(ID)を取得することができます。pushの第1引数にパスを指定して、第2引数は省略します。 firebase.push(‘path/to/data’)はサーバへ通信を行わないので、オフライン時にも結果がすぐに返ってきます。

firebase.push('path/to/data').keyでkey(ID)を取得した後、firebase.set(`path/to/data/${id}`,obj)を実行することで、先に取得したkey(ID)にデータを登録することができます。

keyの事前取得は、上の公式ページのように同一キーで複数のパスに書き込む場合や、以下で示すように新規作成されたデータがサーバにコミット(データが登録)されたかどうかを表示する場合に使用します。

使用例: リストに追加(新規作成)されたデータがサーバに送信中かを表示したい

タスク管理アプリにて、 pushしたデータの送信ステータスをデータごとに表示します。 リストにタスクを追加すると、送信中を示す矢印を表示し、コミット(サーバへのデータ登録)が完了すると矢印を消去します。エラーが起こった場合は、警告マークを表示します。

動作イメージ↓

f:id:yucatio:20181114145054p:plain

action

actionの実装例です。

// reduxのaction
export const addTodo = (uid, text) => {  // uidはユーザID
  // redux-thunk
  return (dispatch, getState, {getFirebase}) => {
    const firebase = getFirebase();
    // key(id)の取得
    const id = firebase.push(`todos/${uid}`).key;

    // “送信中”の表示をする
    dispatch({type: ADD_TODO_REQUEST, todoId: id});
    // 取得したidでデータをセットする
    firebase.set(`todos/${uid}/${id}`,{
        completed: false,
        text,
    }).then(() => {
      // 表示をクリアする
      dispatch({type: ADD_TODO_SUCCESS, todoId: id});
    }).catch(err => {
      // エラーを表示する
      dispatch({type: ADD_TODO_ERROR, todoId: id, err});
    });
  }
}

reducer

reducerの実装例です。

const todoStatuses = (state = {}, action) => {
  switch (action.type) {
    case ADD_TODO_REQUEST:
      return { ...state, [action.todoId]: {status : 'sending', message: '送信中'}}
    case ADD_TODO_SUCCESS:
      return { ...state, [action.todoId]: {status : 'success'}}
    case ADD_TODO_ERROR:
      return { ...state, [action.todoId]: {status : 'error', message: 'エラーが発生しました。時間をおいて再度お試しください。'}}
    default:
      return state
  }
}

export default todoStatuses

あとは state.todoStatuses[todoId].statusの値によって表示を出し分ければ完了です。

あとがき

keyの取得方法はどうやらfirebaseのバージョンによって.key.key()のどちらを使用するか異なるので、片方でうまくいかなかったらもう片方を試してみてもよいかと思います。

redux-thunkとreact-redux-firebaseのつなぎ方は、こちらの記事を参照ください。

yucatio.hatenablog.com

バージョン

  • react-redux-firebase: 2.1.8

Material-UIのwithStyleとreacrt-reduxのconnectを同時に使う

Material-UIのwithStyleとreacrt-reduxのconnect

react-reduxを利用しているアプリにMaterial-UIのstylesを組み込む、もしくはその逆を行うときに、どのようにすれば分からなかったので書いておきます。

connectを使用したコンポーネント

import React from 'react'
import { connect } from 'react-redux'

const SampleComponent = () => {
  // 略
}

const mapStateToProps = (state) => ({
  // 略
})

const mapDispatchToProps = (dispatch) => ({
  // 略
})

export default connect(
  mapStateToProps,
  mapDispatchToProps
)(SampleComponent)

withStylesを使用したコンポーネント

import React from 'react'
import { withStyles } from '@material-ui/core/styles'

const SampleComponent = () => {
  // 略
}

const styles = theme => ({
  // 略
})

export default withStyles(styles)(SampleComponent)

を、同時に使いたい。

composeを使う

reduxのcompose関数を使用すると、withStyleとconnectを同時に使用することができます。

import React from 'react'
import { compose } from 'redux'
import { connect } from 'react-redux'
import { withStyles } from '@material-ui/core/styles'

const SampleComponent = () => {
  // 略
}

const styles = theme => ({
  // 略
})

const mapStateToProps = (state) => ({
  // 略
})

const mapDispatchToProps = (dispatch) => ({
  // 略
})

export default compose(
  withStyles(styles),
  connect(
    mapStateToProps,
    mapDispatchToProps
))(SampleComponent)

composeを使わない場合

compose関数は、関数を合成してくれる関数です。合成とは、”他の関数の戻り値”を入力とする関数を作成することです。 例えば、compose(a, b)(x)は、a(b(x))と同じ意味になります。

composeを使わない場合は以下のように書くことができます。

// 略

export default withStyles(styles)(
  connect(
    mapStateToProps,
    mapDispatchToProps
  )(SampleComponent)
)

composeを使うよりネストが深くなりました。

バージョン

  • react: 16.5.0
  • react-redux: 5.0.7
  • redux: 4.0.0
  • @material-ui/core: 3.4.0

Firebaseアプリの公開 (STEP 3 : 他のユーザのタスクが見れるタスク管理アプリを作成する - React + Redux + Firebase チュートリアル)

★前回の記事

yucatio.hatenablog.com

アプリが完成したので、Firebaseにアプリを公開します。

ビルドします。

$ yarn run build

一旦ローカルで正常に動くか確認しましょう。--only hostingオプションで、hostingのみ動作するようにします。(functionはserveしない)

$ firebase serve --only hosting

http://localhost:5000にアクセスして、動作確認しましょう。 確認が終わったら、Firebaseにデプロイします。functionsは既にデプロイしてあるので、hostingのみデプロイします。

$ firebase deploy --only hosting

=== Deploying to 'todo-sample-xxxxx’…

i  deploying hosting
i  hosting[todo-sample-xxxxx]: beginning deploy...
i  hosting[todo-sample-xxxxx]: found 7 files in build
✔  hosting[todo-sample-xxxxx]: file upload complete
i  hosting[todo-sample-xxxxx]: finalizing version...
✔  hosting[todo-sample-xxxxx]: version finalized
i  hosting[todo-sample-xxxxx]: releasing new version...
✔  hosting[todo-sample-xxxxx]: release complete
✔  Deploy complete!

Project Console: https://console.firebase.google.com/project/todo-sample-xxxxx/overview
Hosting URL: https://todo-sample-xxxxx.firebaseapp.com

無事デプロイできたので、https://todo-sample-xxxxx.firebaseapp.com にアクセスします。(todo-sample-xxxxは自身のプロジェクトIDに置き換えてください。)

f:id:yucatio:20181102121736p:plain

アプリが公開できました!

ログインしたユーザへのタスクの追加・更新と、ログインしたユーザとは別のユーザのタスクを見ることができました。

これでSTEP 3は終了です。本格的なアプリになってきましたね。STEP 4ではMateria-UIを導入して見た目を整えます。

★次回の記事

yucatio.hatenablog.com

★目次

yucatio.hatenablog.com