★前回の記事
Material-UIにおいて個別にスタイルを適用するには、stylesオブジェクト(またはstyles関数)とwithStyleを使用します。
前回適用したPaperの周りにマージンと中に余白(padding)を設定します。

ダッシュボードにスタイルを適用する
ダッシュボートのマージンと余白を設定します。
src/components/dashboard/index.js({/* xxx */}のコメントは実行前に削除してください)
import PropTypes from 'prop-types'  // 追加
import { withStyles } from '@material-ui/core/styles'  // 追加

// stylesを追加
const styles = theme => ({  // #1
  root: {
    padding: theme.spacing.unit * 5,
  },
  content: {
    maxWidth: 800,
    marginLeft  : 'auto',
    marginRight : 'auto',
  },
})

const Dashboard = ({classes}) => (  {/* #2 */}
  <div className={classes.root}>  {/* #3 */}
    <div className={classes.content}>  {/* #4 */}
      <RecentUpdatedTodos />
    </div>
  </div>
)

// propTypesを追加
Dashboard.propTypes = {
  classes: PropTypes.object.isRequired,
}

export default withStyles(styles)(Dashboard)  // #5
themeを引数に取る関数stylesを定義します(#1)。themeはUIの設定が入ったオブジェクトです。デフォルトの設定は Default Theme - Material-UI に書いてあります。- (#1)で設定したcss設定を
classesという名前で下位コンポーネントに渡します(#5)。withStylesという関数を使用します。 - Dashboardコンポーネントで
classesプロパティを受け取ります(#2)。 classNameにstylesで定義した内容を指定します(#3, #4)。
実行結果です。Paperとナビボタンとの間が空きました。Paperの幅が最大800pxに制限され、左右均等に余白ができました。

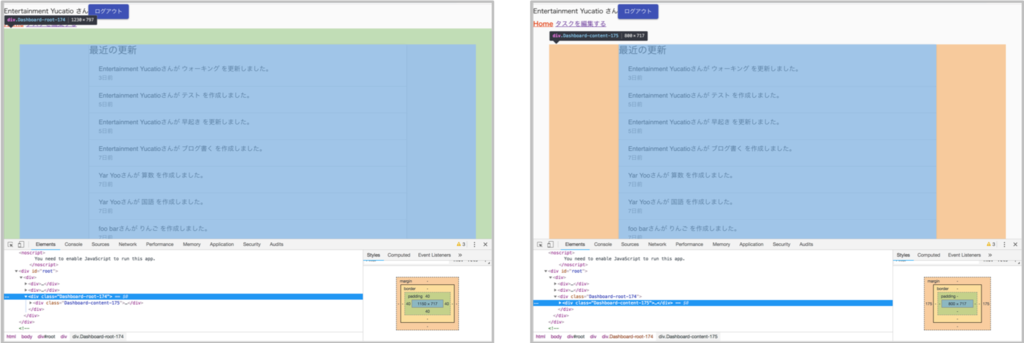
Google Cromeのデベロッパーツールでも確認できました。

引き続き”最近の更新”の文字周りと読み込み中表示のCircularProgress、"データがありません。”の表示の周りにmargin及びpaddingを適用します。
withStyles関数をfirebaseConnectやconnectと同時に使う時は、compose関数の中に並べます。
src/components/dashboard/recentUpdatedTodos/index.js
import { withStyles } from '@material-ui/core/styles'  // 追加

// stylesを追加
const styles = theme => ({
  title: {
    paddingTop: theme.spacing.unit * 3,
    paddingRight: theme.spacing.unit * 3,
    paddingLeft: theme.spacing.unit * 3,
  },
  message: {
    marginTop: theme.spacing.unit * 2,
    marginBottom: theme.spacing.unit * 2,
    marginRight: theme.spacing.unit * 3,
    marginLeft: theme.spacing.unit * 3,
  }
})

const RecentUpdatedList = (todos, classes) => {  // classesを追加
  if (!isLoaded(todos)) {
    return <CircularProgress className={classes.message} />  // classNameを追加
  }
  if (isEmpty(todos)) {
    return <Typography variant="body1" className={classes.message}>データがありません。</Typography>  // classNameを追加
  }
  // 略
}

let RecentUpdatedTodos = ({todos, classes}) => {  // classesを追加
  return (
    <Paper>
      <Typography variant="h5" className={classes.title}>最近の更新</Typography>  {/* classNameを追加 */}
      {RecentUpdatedList(todos, classes)}  {/* classesを引数に追加 */}
    </Paper>
  )
}

RecentUpdatedTodos.propTypes = {
  // 略
  classes: PropTypes.object.isRequired,  // 追加
}

RecentUpdatedTodos = compose(
  withStyles(styles),  // 追加
  firebaseConnect(firebaseQueries),
  connect(
   mapStateToProps
))(RecentUpdatedTodos)
実行結果です。”最近の更新”の文字とPaperの縁の間に余白ができました。

読み込み中のぐるぐるの周りにも余白を追加しました。

以上でwithStylesを使用してダッシュボードにスタイルを適用することができました。
★次回の記事
★目次