yucatio@システムエンジニア

趣味で作ったものいろいろ

フィールドが分割された時に探索をやめる (KATAMINOを解くプログラムを作成する)

★前回の記事

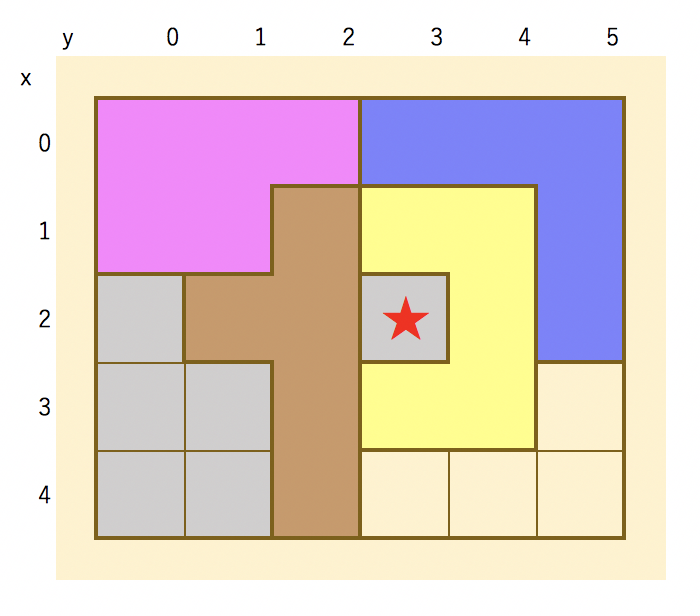
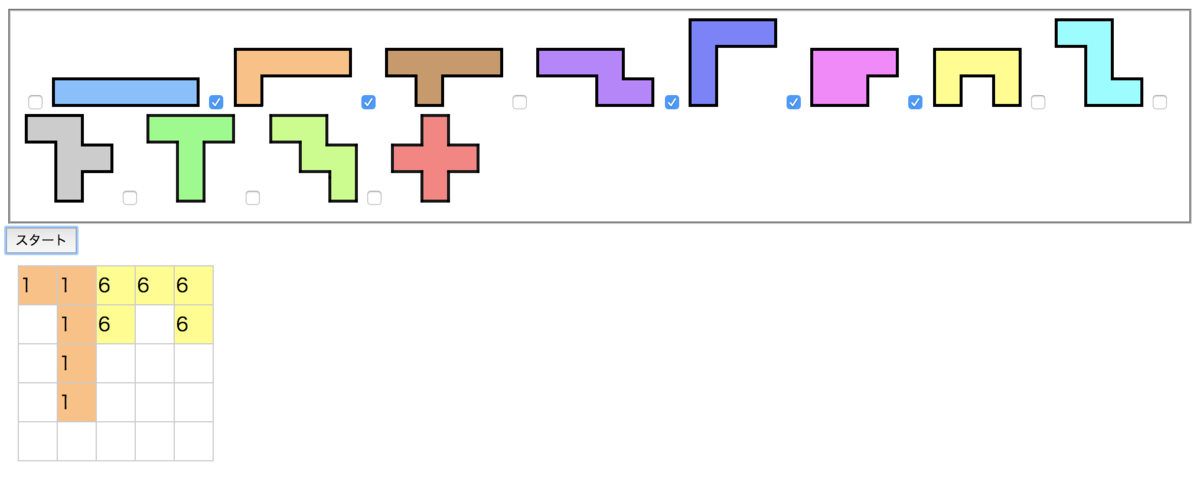
前回まででピースを画面から選ぶことができ、解く過程も表示することができました。 いくつかの組み合わせを試してみると、以下の画像のように、フィールドに穴が空いている場合でも、ピースを置くのを続けてしまう場合があることに気づきます。

★印のような穴が空いてしまっても、解くのを続けてしまう↓
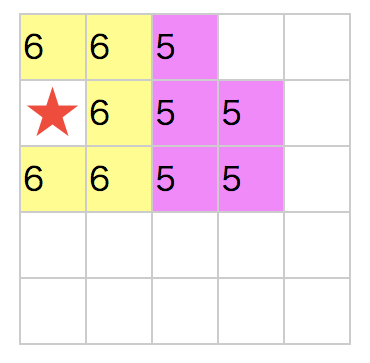
f:id:yucatio:20190815103202p:plain

今回は、穴が空いてしまった場合に処理を中断する処理を入れます。

実装方針

穴が空いてしまっている状況は、フィールドが分断されている状態です。分断を検知するアルゴリズムはいくつかありますが、今回は上下左右に連続したマスを数えることで分断を検知します。 ただし、分断されていても問題ないケースがあります。それは分断された個々のフィールドにピースが置ける場合です。

穴が空いてしまってこれ以上置けない例↓
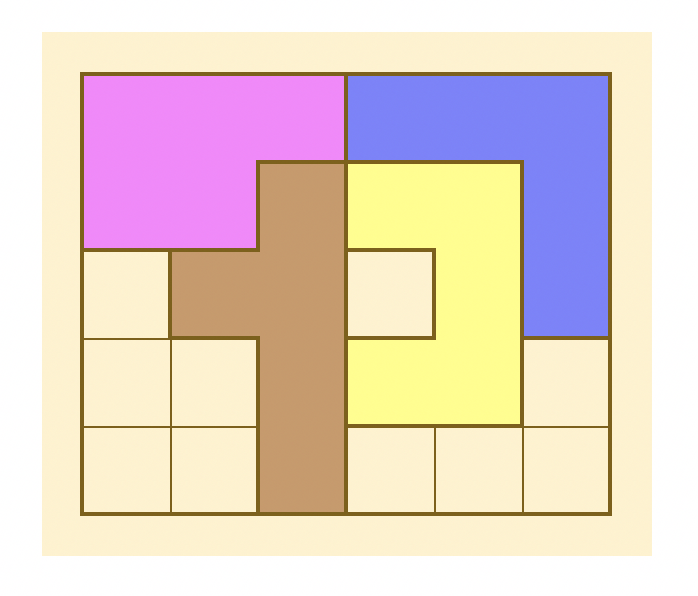
f:id:yucatio:20190814235659p:plain:w350

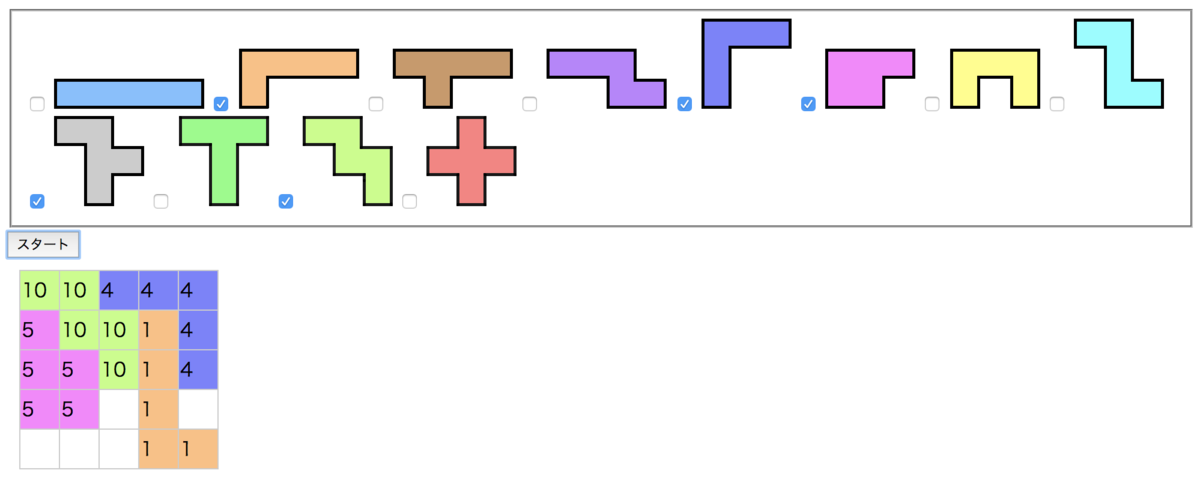
フィールドは分断されているがまだピースが置ける可能性がある例↓

f:id:yucatio:20190814235715p:plain:w350

これら2つの例の違いは、個々の分断されたフィールドのマスの個数が5の倍数かどうかです。 KATAMINOのピースは5個の正方形をつなげてできる形なので、5の倍数の連続したマスであれば、ピースが置ける可能性があるのです。

そこで、連続しているマスの個数を数え、それが5の倍数であるかどうか判定します。5の倍数であればそのまま解くのを続け、そうでなければこれ以上スタックにデータを投入しないようにします。

連続するマスの数を求めるアルゴリズムを考えましょう。探索のアルゴリズムが使えそうです。 起点となる空白マスから、上下左右に空白マスを探します。空白マスを見つけたら空白マスの個数をカウントアップし、マスを訪問済みにマークします。 今回は幅優先探索で実装してみましょう。キュー(queue)を使用します。アルゴリズムは以下のようになります。

  1. 起点となる空白マスをキューに入れる、空白の個数を0に初期化する
  2. キューから1つ、マスのデータを取り出す
  3. マスが空白でない、または訪問済みであったら1に戻る
  4. マスが空白だったら、カウントを1つ増やし、マスを訪問済みにする
  5. 上下左右のマスをキューに入れる
  6. 2に戻る

これを繰り返した図が以下となります。

{x:2, y:0}(★マークのマス)を起点とする場合。{x:2, y:0}を訪問済みにマークする(図では灰色の背景で表現)↓

f:id:yucatio:20190815102546p:plain

上下左右のマスをキューに投入する(フィールドの範囲外でも気にせず投入する)↓

f:id:yucatio:20190815102559p:plain

キューから先頭(図では一番左)の要素({x:3, y:0})を取り出し、訪問済みでない空白なので、訪問済みにマークする。↓

f:id:yucatio:20190815102614p:plain

上下左右のマスをキューに投入する(フィールドの範囲外でも気にせず投入する)↓

f:id:yucatio:20190815102628p:plain

キューから先頭(図では一番左)の要素({x:2, y:1})を取り出す。空白マスでないので、次のデータをキューから取り出す↓

f:id:yucatio:20190815102642p:plain

以下、繰り返す

実装

はじめに、スタブを作成し、呼び出し側の実装をします。

js/solver.js

const solver = {
  // 中略
  solve : () => {
    if (solver.solverStack.length <= 0) {
      console.log("解けなかった")
      return
    }

    const {kataminoField, minEmpty, pieceId, spinId, spin, unPlacedPiece} = solver.solverStack.pop()

    // 中略

    display.show(nextField)

    if (nextUnPlaced.length <= 0) {
      console.log("完成")
      return
    }

    const nextEmpty = solver.findNextEmpty(nextField, minEmpty)
    console.log("nextEmpty", nextEmpty)

    // 追加ここから
    if (! solver.hasAllFiveTimesCells(nextField, nextEmpty)){
      console.log("フィールドが5の倍数以外で分断されている")
      setTimeout(solver.solve, 300)
      return
    }
    // 追加ここまで

    nextUnPlaced.forEach((nextPieceId) => {
      KATAMINO_ARR[nextPieceId].forEach((nextSpin, nextSpinId) => {
        solver.solverStack.push({kataminoField: nextField, minEmpty: nextEmpty, pieceId:nextPieceId, spinId:nextSpinId, spin: nextSpin, unPlacedPiece: nextUnPlaced,})
      })
    })

    setTimeout(solver.solve, 300)
  },
  // 中略

  // 追加ここから
  /**
   * 全ての連続した空白マスの数が5の倍数か判定します
   */
  hasAllFiveTimesCells: (kataminoField, minEmpty) => {
    // TODO 実装
    return false
  },

  /**
   * emptyPlaceを含む連続した空白マスの個数が5の倍数か判定します
   */
  hasFiveTimesCells: (kataminoField, emptyPlace) => {
    // TODO 実装
    return false
  },
  // 追加ここまで
}

hasAllFiveTimesCellsは全ての連続した空白マスの数が5の倍数か、hasFiveTimesCellsemptyPlaceを含むフィールドが5の倍数のマスを持つかを判定します。hasFiveTimesCellsの中で、見つけた空白のセルを訪問済みにマークします。

hasAllFiveTimesCellsを実装します。この関数の中では、1つの空白マスをhasFiveTimesCellsに渡し、その空白マスから連続した空白マスを訪問済みにマークしてもらいます。その後、まだピースが置かれていない、かつ訪問済みでない空白マスを見つけ、上記を繰り返します。訪問済みでない空白マスがなくなったとき、全て5の倍数の連続した空白マスであれば、trueを返します。

minEmpty(★印のマス)↓

f:id:yucatio:20190815101721p:plain:w350

minEmpty(★印のマス)を含む連続した空白マスを訪問済みに訪問済みにマーク(図では灰色の背景で表現)↓
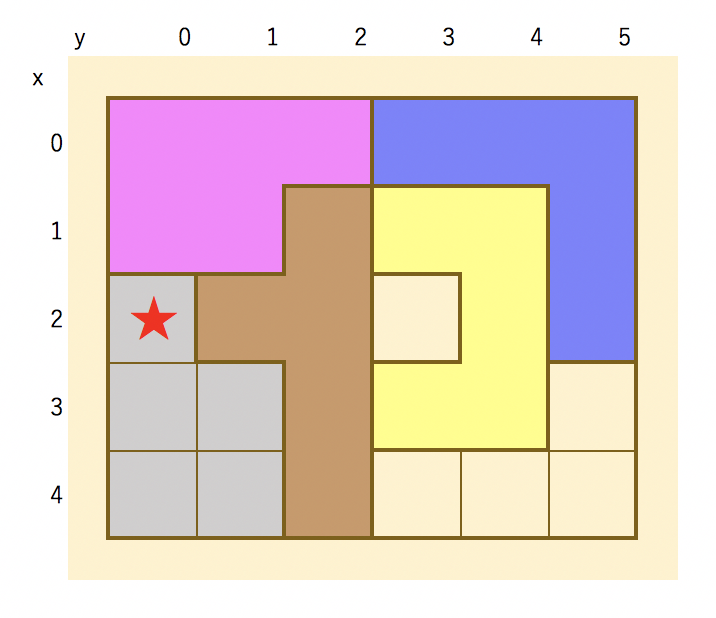
f:id:yucatio:20190815101735p:plain:w350

次の訪問済みでない空白↓

f:id:yucatio:20190815101747p:plain:w350

★印のマスを含む連続した空白マスを訪問済みに訪問済みにマーク↓

f:id:yucatio:20190815101802p:plain:w350

hasFiveTimesCellsの中で、フィールドの内容を更新するので、引数に受け取ったkataminoFieldをコピーします。2次元配列なので、util.copyArrayOfArrayを使用します。 hasFiveTimesCellsに渡す空白マス(nextEmpty)は、minEmptyで初期化します。

nextEmptyが存在する場合は、hasFiveTimesCellsを呼び出します。 次の空白の更新にはfindNextEmpty関数を使用します。

js/solver.js

  hasAllFiveTimesCells: (kataminoField, minEmpty) => {
    const kataminoFieldCopy = util.copyArrayOfArray(kataminoField)
    let nextEmpty = minEmpty

    while (nextEmpty) {
      if (! solver.hasFiveTimesCells(kataminoFieldCopy, nextEmpty)) {
        return false
      }
      nextEmpty = solver.findNextEmpty(kataminoFieldCopy, nextEmpty)
    }
    return true
  },

現在の実装では、空白がなくなったときにfindNextEmptyを呼び出すと配列の範囲外の値を返すので修正します。空白がなくなったときにundefinedを返します。

js/solver.js

  findNextEmpty : (kataminoField, previousEmpty) => {
    // 変更ここから
    const minEmptyX = kataminoField.slice(previousEmpty.x).findIndex(row =>
      row.some((val) => val < 0)
    )
    if (minEmptyX < 0) {
      // 空白マスが見つからなかった
      return undefined
    }
    const x = previousEmpty.x + minEmptyX
    // 変更ここまで

    const y = kataminoField[x].findIndex(val => val < 0)

    return {x, y}
  },

hasFiveTimesCellsを実装します。emptyPlaceでキューを初期化します。 キューにデータがあるあいだ、キューからデータを取り出し、取り出した部分が空白であればカウントアップし、セルの値を100(適当な正の値)に更新します。その後上下左右のマスをキューに投入します。 最後に連続した空白マスの数が5の倍数かを返します。

js/solver.js

  hasFiveTimesCells: (kataminoField, emptyPlace) => {
    const queue = [emptyPlace]
    let count = 0

    while (queue.length > 0) {
      const currentPlace = queue.shift()

      if (! solver.isEmpty(kataminoField, currentPlace)) {
        continue
      }

      count++
      kataminoField[currentPlace.x][currentPlace.y] = 100

      queue.push({x:currentPlace.x + 1, y: currentPlace.y})
      queue.push({x:currentPlace.x, y: currentPlace.y + 1})
      queue.push({x:currentPlace.x - 1, y: currentPlace.y})
      queue.push({x:currentPlace.x, y: currentPlace.y - 1})
    }

    return count%5 === 0
  },

動作確認

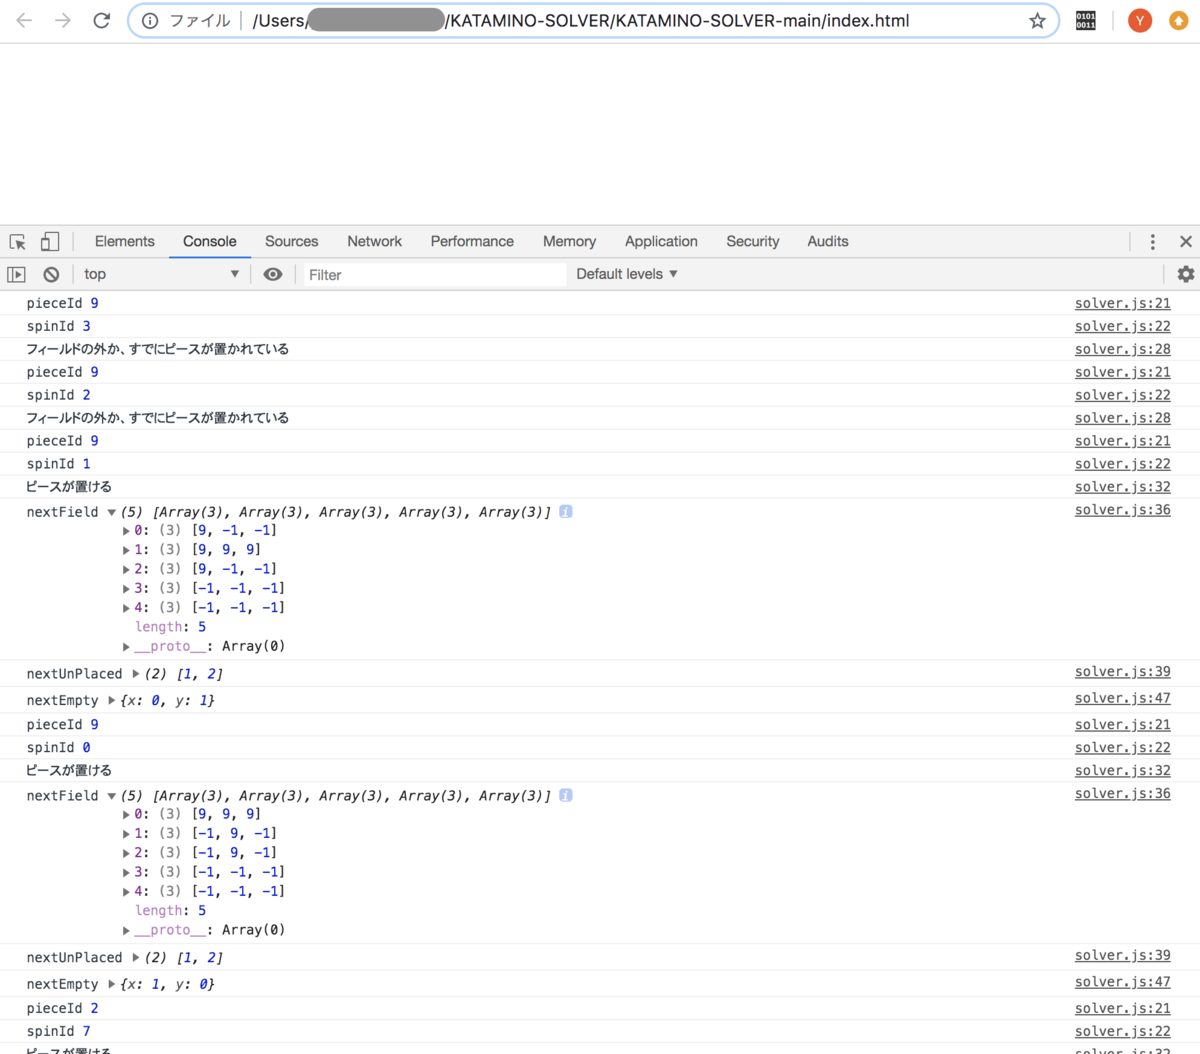
実行結果です。フィールドが分断された時に処理を中断しているのが分かります。
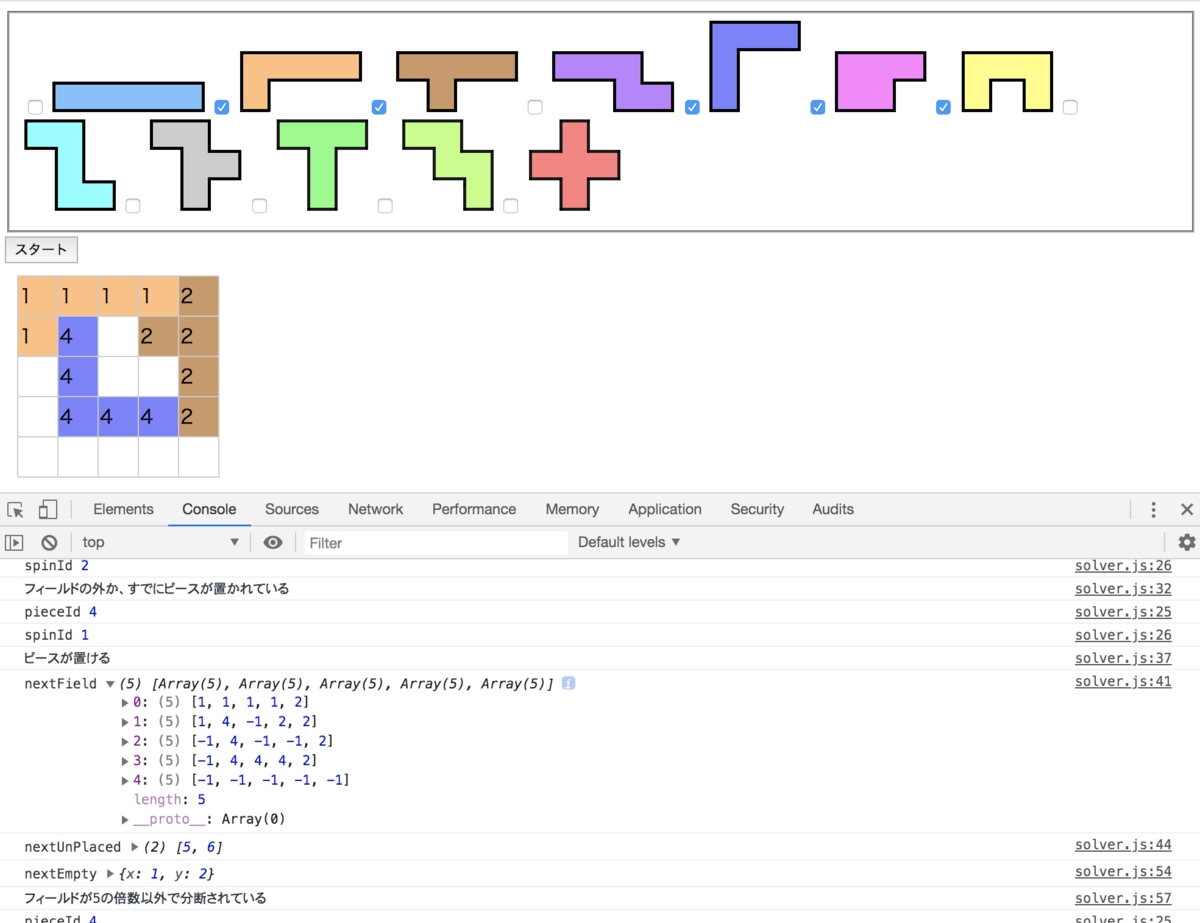
f:id:yucatio:20190814235234p:plain

画面の表示でも、無駄にピースを置く回数が減っているのが分かります。

f:id:yucatio:20190814235255p:plain

以上でフィールドが分割された時に探索をやめることができました。

KATAMINOを解くアルゴリズムのSTEP1は以上になります。この連載ではこれ以上アルゴリズムの改良はしませんが、まだまだ改良の余地があるので、ご自身でチャレンジしてみてください。


★次回の記事

yucatio.hatenablog.com

★目次

yucatio.hatenablog.com

ピースを画面から選べるようにする (KATAMINOを解くプログラムを作成する)

★前回の記事

yucatio.hatenablog.com

これまで、使用するピースはjs/main.jsで指定してきましたが、画面で選べるように変更します。

表示するピースの画像の準備

ピースを選択する際にどのピースの画像を表示させます。画像をダウンロードします。

KATAMINO-SOLVER/KATAMINO-SOLVER-main/img/piece at master · yucatio/KATAMINO-SOLVER · GitHub

ピース画像は上記リンクのpiece_0_0.png, piece_1_0.png, piece_2_0.png, piece_3_0.png, ... piece_10_0.png, piece_11_0.png を使用します。

img/pieceフォルダを作成し、piece_0_0.pngからpiece_11_0.pngまでをこのフォルダ内に保存します。

f:id:yucatio:20190808154351p:plain

入力フォームを作成します。フォームにチェックボックスと、それに対応するピースの画像、最後にボタンを作成します。

index.html

<!DOCTYPE html>
<html>
  <head>
    <meta charset="utf-8">
    <title>KATAMINO SOLVER</title>
    <link rel="stylesheet" type="text/css" href="css/main.css">
  </head>
  <body>
    <!-- 追加ここから -->
    <form name="piece-selection">
      <fieldset>
        <input id="piece_0" type="checkbox" name="piece" value="0">
        <label for="piece_0">
          <img src="img/piece/piece_0_0.png" width="125px"/>
        </label>
        <input id="piece_1" type="checkbox" name="piece" value="1" checked>
        <label for="piece_1">
          <img src="img/piece/piece_1_0.png" width="100px"/>
        </label>
        <input id="piece_2" type="checkbox" name="piece" value="2" checked>
        <label for="piece_2">
          <img src="img/piece/piece_2_0.png" width="100px"/>
        </label>
        <input id="piece_3" type="checkbox" name="piece" value="3">
        <label for="piece_3">
          <img src="img/piece/piece_3_0.png" width="100px"/>
        </label>
        <input id="piece_4" type="checkbox" name="piece" value="4">
        <label for="piece_4">
          <img src="img/piece/piece_4_0.png" width="75px"/>
        </label>
        <input id="piece_5" type="checkbox" name="piece" value="5">
        <label for="piece_5">
          <img src="img/piece/piece_5_0.png" width="75px"/>
        </label>
        <input id="piece_6" type="checkbox" name="piece" value="6">
        <label for="piece_6">
          <img src="img/piece/piece_6_0.png" width="75px"/>
        </label>
        <input id="piece_7" type="checkbox" name="piece" value="7">
        <label for="piece_7">
          <img src="img/piece/piece_7_0.png" width="75px"/>
        </label>
        <input id="piece_8" type="checkbox" name="piece" value="8">
        <label for="piece_8">
          <img src="img/piece/piece_8_0.png" width="75px"/>
        </label>
        <input id="piece_9" type="checkbox" name="piece" value="9" checked>
        <label for="piece_9">
          <img src="img/piece/piece_9_0.png" width="75px"/>
        </label>
        <input id="piece_10" type="checkbox" name="piece" value="10">
        <label for="piece_10">
          <img src="img/piece/piece_10_0.png" width="75px"/>
        </label>
        <input id="piece_11" type="checkbox" name="piece" value="11">
        <label for="piece_11">
          <img src="img/piece/piece_11_0.png" width="75px"/>
        </label>
      </fieldset>
      <button type="button">スタート</button>
    </form>
    <!-- 追加ここまで -->

    <div id="katamino-field">
      <table id="katamino-table">
        <tr>
          <td>
          </td>
        </tr>
      </table>
    </div>

    <script src="js/util.js"></script>
    <script src="js/katamino-arr.js"></script>
    <script src="js/display.js"></script>
    <script src="js/solver.js"></script>
    <script src="js/main.js"></script>
  </body>
</html>

実行結果です。チェックボックスと対応するピースの画像が表示されました。まだボタンを押しても何も起こりません。

f:id:yucatio:20190808154747p:plain

ボタンが押されたときに呼び出される関数を作成します。先に選択されたピースを取得するところまで実装します。今までの実装は削除します。 選択されているピースの番号を取得し、 document.getElementsByName("piece")でピースのセレクトッボックスのhtmlノードを取得します。 このメソッドが返す値は、配列ではなく、配列風オブジェクトなので、mapfilterは呼び出せません。 Array.from(pieceInputs)( Array.from() - JavaScript | MDN ) で配列に変換します。filterでチェックがついている要素のみに絞り込み、さらにそれらの値を整数値に変換します。

js/main.js

// solver.init([1, 2, 9]) は削除
// solver.solve() は削除

function startSolve() {
  console.log("startSolve")

  const pieceInputs = document.getElementsByName("piece")

  const targetPiece = Array.from(pieceInputs).filter(pieceElement =>
    pieceElement.checked
  ).map(pieceElement =>
    parseInt(pieceElement.value, 10)
  )

  console.log(targetPiece)

}

KATAMINOはピースが3つ以上でないと解けないため、3以下の場合はreturnします。本来であれば画面にエラーメッセージを表示すべきですが、今回はコンソールのみに表示します。エラーメッセージはSTEP2で表示します。

チェックが終わったらsolverを初期化し、スタートします。

js/main.js

// solver.init([1, 2, 9]) は削除
// solver.solve() は削除

function startSolve() {
  console.log("startSolve")

  const pieceInputs = document.getElementsByName("piece")

  const targetPiece = Array.from(pieceInputs).filter(pieceElement =>
    pieceElement.checked
  ).map(pieceElement =>
    parseInt(pieceElement.value, 10)
  )

  console.log(targetPiece)

  // 追加ここから
  if (targetPiece.length < 3) {
    // TODO: エラーメッセージを表示
    console.log("選択されたピースの個数が3未満")
    return
  }

  solver.init(targetPiece)
  solver.solve()
  // 追加ここまで
}

最後にボタンが押されたときにstartSolve()を呼び出すように変更します。

index.html

<!DOCTYPE html>
<html>
  <head>
    <meta charset="utf-8">
    <title>KATAMINO SOLVER</title>
    <link rel="stylesheet" type="text/css" href="css/main.css">
  </head>
  <body>
    <form name="piece_selection">
        <!-- 中略 -->
       <button type="button" onclick="startSolve()">スタート</button>  <!-- 変更 -->
    </form>
    <!-- 中略 -->
  </body>
</html>

動作確認

実行結果です。選択されたピースでKATAMINOを説いています。

解いている途中↓

f:id:yucatio:20190810210048p:plain

完成↓

f:id:yucatio:20190810210112p:plain

以上でピースを画面から選べるようになりました。考慮すべき点がもれているところはいくつかありますが、STEP2でカバーしていきます。


★次回の記事

yucatio.hatenablog.com

★目次

yucatio.hatenablog.com

JavaScriptのsetTimeoutを使用して途中経過を表示する (KATAMINOを解くプログラムを作成する)

★前回の記事

yucatio.hatenablog.com

前回までで解けた場合のフィールドを表示しました。今回は途中の経過も表示します。 ピースが置けた時にフィールドを更新します。

途中経過の表示方法

途中経過を表示します。ピースが置けたときに画面を更新します。 画面を一定時間ごとに更新したいので、処理を待たせるコードを入れたいのですが、 JavaScriptにはsleepのような関数はありません。 代わりに、setTimeout( WindowOrWorkerGlobalScope.setTimeout() - Web API | MDN ) を使用します。setTImeoutの引数に、現在実行しているsolver.solve関数を指定し、繰り返し処理を行います。 そのため、whileによるループは不要になります。

実装

はじめに、フィールドの再描画を行うための準備をします。 現在display.js内で、テーブルをhtmlの最後の要素として追加していますが、divの内容を書き換えるように変更します。

index.html

<!DOCTYPE html>
<html>
  <head>
    <!-- 中略 -->
  </head>
  <body>
    <!-- 追加ここから -->
    <div id="katamino-field">
      <table id="katamino-table">
        <tr>
          <td>
          </td>
        </tr>
      </table>
    </div>
    <!-- 追加ここまで -->

    <!-- 中略 -->
  </body>
</html>

次に、katamino-fieldの中の、katamino-tableを置き換えるように変更します。

js/display.js

const display = {
  show : (kataminoField) => {
    const table = document.createElement("table")
    table.setAttribute("id","katamino-table")

    kataminoField.forEach((fieldRow) => {
        // 中略
    })
    // 変更ここから
    const old = document.getElementById("katamino-table")
    document.getElementById("katamino-field").replaceChild(table, old)
    // 変更ここまで
  },
}

準備が整ったので、js/solver.jsを、setTimeoutを使用するように書き換えます。

solver.solveのはじめに、スタックが空かどうか判定するロジックを入れています。

ピースがフィールドの外か、すでにピースが置かれているので置けない場合は、次の処理をすぐ実行するように、 setTimeout(solver.solve, 0)を実行します。continuereturnに変更します。

ピースが置けたときはdisplay.show(nextField)を実行し、表示を更新します。また、関数の一番最後でsetTimeout(solver.solve, 300)を実行して次のループを300ミリ秒後に行うように設定します。

KATAMINOが完成した場合の、breakreturnに変更します。

js/solver.js

const solver = {
  // 中略
  solve : () => {
    // 追加ここから
    if (solver.solverStack.length <= 0) {
      console.log("解けなかった")
      return
    }
    // 追加ここまで

//    while (solver.solverStack.length > 0) { 削除
    const {kataminoField, minEmpty, pieceId, spinId, spin, unPlacedPiece} = solver.solverStack.pop()

    console.log("pieceId", pieceId)
    console.log("spinId", spinId)

    const offset = {x: minEmpty.x, y: minEmpty.y - spin[0].y}

    if (! solver.isAllEmpty(kataminoField, spin, offset)) {
      // フィールドの外か、すでにピースが置かれている
      console.log("フィールドの外か、すでにピースが置かれている")
      setTimeout(solver.solve, 0)  // 追加
      return  // 変更
    }

    console.log("ピースが置ける")

    const nextField = util.copyArrayOfArray(kataminoField)
    solver.placeSpin(nextField, spin, offset, pieceId)
    console.log("nextField", nextField)

    const nextUnPlaced = unPlacedPiece.filter(id => id !== pieceId)
    console.log("nextUnPlaced", nextUnPlaced)

    display.show(nextField)  // 追加

    if (nextUnPlaced.length <= 0) {
      console.log("完成")
      // display.show(nextField) は削除
      return  // 変更
    }

    const nextEmpty = solver.findNextEmpty(nextField, minEmpty)
    console.log("nextEmpty", nextEmpty)

    nextUnPlaced.forEach((nextPieceId) => {
      KATAMINO_ARR[nextPieceId].forEach((nextSpin, nextSpinId) => {
        solver.solverStack.push({kataminoField: nextField, minEmpty: nextEmpty, pieceId:nextPieceId, spinId:nextSpinId, spin: nextSpin, unPlacedPiece: nextUnPlaced,})
      })
    })

    setTimeout(solver.solve, 300)  // 追加

//    }  削除
  },
}

動作確認

実行結果です。ピースを置いていく過程がアニメーションされました。

f:id:yucatio:20190805082330p:plain


★次回の記事

yucatio.hatenablog.com

★目次

yucatio.hatenablog.com

セルに色をつける (KATAMINOを解くプログラムを作成する)

★前回の記事

yucatio.hatenablog.com

前回の記事で解けた内容を画面に表示しました。まだ見づらいので今回は見た目を整えていきます。 テーブルの枠線の表示し各セルに色をつけます。

色の準備

各ピースの色は以下のとおりです。

f:id:yucatio:20190730084610p:plain

各ピースの色は

パステルカラー - Pastel Colors

ここのページの一番上の段を使用しました。KATAMINOの各ピースの実際の色と近いものをあてはめました。(ピース番号=0, 1, 3, 4, 5, 6, 7, 9. 10, 11)

足りない部分は

Webセーフカラー web216 - Web Safe Colors

こちらから色を探しました。(ピース番号=2, 8)

実装

はじめにKATAMINOのフィールドとなるテーブルにidを付与します。CSSで指定するためです。

js/display.js

const display = {
  show : (kataminoField) => {
    const table = document.createElement("table")
    table.setAttribute("id","katamino-table")  // 追加

    // 中略

    document.body.appendChild(table)
  },
}

CSSファイルを作成します。cssフォルダを作成し、css/main.cssというファイルを作成します。 css/main.cssファイルにのテーブルの枠線情報、セルの幅、各ピースの色情報を記載します。

css/main.css

#katamino-table {
  border-collapse: collapse;
  margin: 10px;
}

#katamino-table td {
  border: solid 1px #cccccc;
  width:30px;
  height:30px;
}

#katamino-table td.piece0 {
    background-color:#7fbfff;
}

#katamino-table td.piece1 {
  background-color:#ffbf7f;
}

#katamino-table td.piece2 {
  background-color:#cc9966;
}

#katamino-table td.piece3 {
  background-color:#bf7fff;
}

#katamino-table td.piece4 {
  background-color:#7f7fff;
}

#katamino-table td.piece5 {
    background-color:#ff7fff;
}

#katamino-table td.piece6 {
  background-color:#ffff7f;
}

#katamino-table td.piece7 {
  background-color:#7fffff;
}

#katamino-table td.piece8 {
  background-color:#cccccc;
}

#katamino-table td.piece9 {
  background-color:#7fff7f;
}

#katamino-table td.piece10 {
  background-color:#bfff7f;
}

#katamino-table td.piece11 {
  background-color:#ff7f7f;
}

index.htmlで、作成したCSSファイルを読み込みます。

index.html

<!DOCTYPE html>
<html>
  <head>
    <meta charset="utf-8">
    <title>KATAMINO SOLVER</title>
    <link rel="stylesheet" type="text/css" href="css/main.css">  <!-- 追加 -->
  </head>
  <body>
    <!-- 中略 -->
  </body>
</html>

js/display.jsを変更します。各セルにクラスを設定します。値が-1のときは何もクラスを設定しません。

js/display.js

const display = {
  show : (kataminoField) => {
    const table = document.createElement("table")
    table.setAttribute("id","katamino-table")

    kataminoField.forEach((fieldRow) => {
      tableRow = table.insertRow(-1)
      fieldRow.forEach((val) => {
        cell = tableRow.insertCell(-1)
        // 変更ここから
        if (val >= 0) {
          cell.classList.add('piece' + val)
          cell.appendChild(document.createTextNode(val))
        }
        // 変更ここまで
      })
    })

    document.body.appendChild(table)
  },
}

動作確認

実行結果です。テーブルの枠線が表示され、各セルが以下のように色付けされていれば成功です。

f:id:yucatio:20190730085732p:plain


★次回の記事

yucatio.hatenablog.com

★目次

yucatio.hatenablog.com

表示用メソッドの作成 (KATAMINOを解くプログラムを作成する)

★前回の記事

yucatio.hatenablog.com

ここまでコンソールに表示してきましたが、仕上げとして画面に表示してみましょう。

実装

js/display.jsというファイルに表示用関数をまとめることにします。ファイルを 作成して以下の内容を書いておきます。

const display = {
  show : (kataminoField) => {
    // TODO 実装
  },
}

index.htmlを変更します。

<!DOCTYPE html>
<html>
  <head>
    <meta charset="utf-8">
    <title>KATAMINO SOLVER</title>
  </head>
  <body>   
    <script src="js/util.js"></script>
    <script src="js/katamino-arr.js"></script>
    <script src="js/display.js"></script>  <!-- 追加 -->
    <script src="js/solver.js"></script>
    <script src="js/main.js"></script>
  </body>
</html>

今回は簡単に表示するので、kataminoFieldをテーブル形式で表示します。各マスのピースIDを表示してみましょう。

js/display.js

const display = {
  show : (kataminoField) => {
    let table = document.createElement("table")

    kataminoField.forEach((fieldRow) => {
      tableRow = table.insertRow(-1)
      fieldRow.forEach((val) => {
        cell = tableRow.insertCell(-1)
        cell.appendChild(document.createTextNode(val))
      })
    })

    document.body.appendChild(table)
  },
}

KATAMINOが解けたときにnextFieldを表示します。

js/solver.js

const solver = {
    // 中略

  solve : () => {
    while (solver.solverStack.length > 0) {
      // 中略

      if (nextUnPlaced.length <= 0) {
        console.log("完成")
        display.show(nextField)  // 追加
        break
      }

      // 中略
    }
  },
  // 中略
}

動作確認

以下のようになっていれば成功です。完成したときのnextFieldの内容が表示されました。

f:id:yucatio:20190729083100p:plain

見にくいので次回は見た目を調整していきます。


★次回の記事

yucatio.hatenablog.com

★目次

yucatio.hatenablog.com

次に置くピースの投入 (KATAMINOを解くプログラムを作成する)

★前回の記事

yucatio.hatenablog.com

前回まででスタックに新たにデータを投入する準備が整いました。今回はスタックに次のデータを投入しましょう。

実装

solver.initでデータを投入したのと同じように、まだフィールドに置かれていないピースnextUnPlacedの各スピンに対して、pieceIdspinId, spin,kataminoField, minEmpty, unPlacedPieceをスタックに投入します。

js/solver.js

const solver = {
    // 中略

  solve : () => {
    while (solver.solverStack.length > 0) {
      const {kataminoField, minEmpty, pieceId, spinId, spin, unPlacedPiece} = solver.solverStack.pop()

      console.log("pieceId", pieceId)
      console.log("spinId", spinId)

      const offset = {x: minEmpty.x, y: minEmpty.y - spin[0].y}
      
      if (! solver.isAllEmpty(kataminoField, spin, offset)) {
        // フィールドの外か、すでにピースが置かれている
        console.log("フィールドの外か、すでにピースが置かれている")
        continue
      }

      console.log("ピースが置ける")

      const nextField = util.copyArrayOfArray(kataminoField)
      solver.placeSpin(nextField, spin, offset, pieceId)
      console.log("nextField", nextField)

      const nextUnPlaced = unPlacedPiece.filter(id => id !== pieceId)
      console.log("nextUnPlaced", nextUnPlaced)

      if (nextUnPlaced.length <= 0) {
        console.log("完成")
        break
      }

      const nextEmpty = solver.findNextEmpty(nextField, minEmpty)
      console.log("nextEmpty", nextEmpty)

      // 追加ここから
      nextUnPlaced.forEach((nextPieceId) => {
        KATAMINO_ARR[nextPieceId].forEach((nextSpin, nextSpinId) => {
          solver.solverStack.push({kataminoField: nextField, minEmpty: nextEmpty, pieceId:nextPieceId, spinId:nextSpinId, spin: nextSpin, unPlacedPiece: nextUnPlaced,})
        })
      })
      // 追加ここまで
    }
  },
  // 中略
}

動作確認

動作結果です。

(spinId, pieceId) = (9, 1)のピースを置いた後、そのフィールドに対して2,1番のピースが置けるか試しています。

f:id:yucatio:20190725083556p:plain

また、"完成"の文字とすべてのマスが埋まった状態のフィールドが表示されました。

f:id:yucatio:20190725083613p:plain

ここまででKATAMINOを解くプログラムは完成しました。js/main.jssolver.initに渡している値を変えてみて色々な組み合わせを試してみてください。

次回からは画面に表示します。


★次回の記事

yucatio.hatenablog.com

★目次

yucatio.hatenablog.com

最小の空白マスの更新 (KATAMINOを解くプログラムを作成する)

★前回の記事

yucatio.hatenablog.com

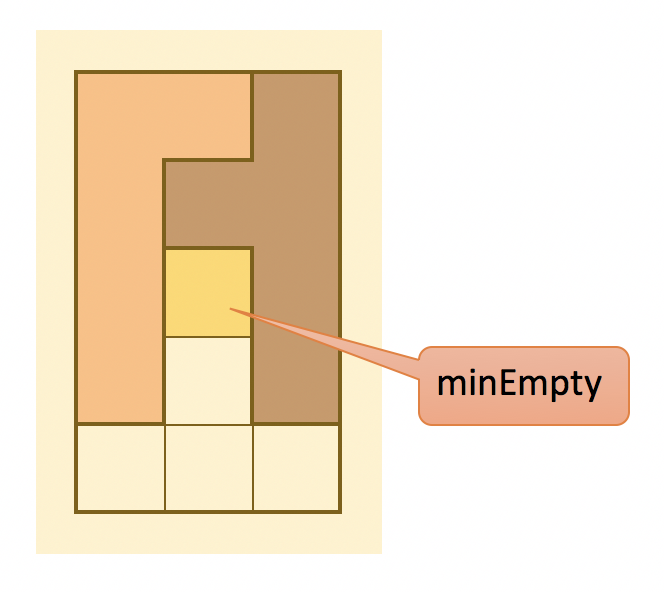
今回はminEmptyの更新をします。minEmptyはピースが置かれていないマスのうち、1番上の段の、1番左のマスです。

f:id:yucatio:20190722133606p:plain:w300

実装

フィールドを渡して最小の空白を探すfindMinEmptyを実装します。まずは呼び出し側を書きます。

js/solver.js

const solver = {
    // 中略

  solve : () => {
    while (solver.solverStack.length > 0) {
      const {kataminoField, minEmpty, pieceId, spinId, spin, unPlacedPiece} = solver.solverStack.pop()

      console.log("pieceId", pieceId)
      console.log("spinId", spinId)

      const offset = {x: minEmpty.x, y: minEmpty.y - spin[0].y}
      
      if (! solver.isAllEmpty(kataminoField, spin, offset)) {
        // フィールドの外か、すでにピースが置かれている
        console.log("フィールドの外か、すでにピースが置かれている")
        continue
      }

      console.log("ピースが置ける")

      const nextField = util.copyArrayOfArray(kataminoField)
      solver.placeSpin(nextField, spin, offset, pieceId)
      console.log("nextField", nextField)

      const nextUnPlaced = unPlacedPiece.filter(id => id !== pieceId)
      console.log("nextUnPlaced", nextUnPlaced)

      if (nextUnPlaced.length <= 0) {
        console.log("完成")
        break
      }

      // 追加ここから
      const nextEmpty = solver.findMinEmpty(nextField)
      console.log("nextEmpty", nextEmpty)
      // 追加ここまで
    }
  },
  // 中略
  // 追加ここから
  findMinEmpty : (kataminoField) => {
    // TODO 実装
  },
  // 追加ここまで
}

findMinEmptyを実装していきます。-1が含まれている配列が初めて現れるインデックスを、Array.findIndex ( Array.prototype.findIndex() - JavaScript | MDN ) で見つけ、その中で-1が何番目なのかさらにArray.findIndexで求めます。(コード内では-1かどうかで判定するのではなく、0より小さいかどうかで判定しています。)

  findMinEmpty : (kataminoField) => {
    const x = kataminoField.findIndex(row => 
      row.some((val) => val < 0)
    )
    const y = kataminoField[x].findIndex(val => val < 0)

    return {x, y}
  },

実行結果

動作結果です。nextEmptyが新しいフィールドでピースが置かれていないマスのうち、1番上の段の、1番左のマスを示しています。

f:id:yucatio:20190723085829p:plain

リファクタリング

現在のminEmptyを渡すことによって、最小の空白を探す範囲が少し狭くなります。 minEmpty.xより小さい範囲は探さなくて済むからです。 Array.slice ( Array.prototype.slice() - JavaScript | MDN ) で現在のminEmpty.x以降の配列を作成します。インデックスを調整するため、見つかったxの インデックスにpreviousEmpty.xを足しています。

関数名をfindMinEmptyからfindNextEmptyに変更します。

const solver = {
  // 中略

  solve : () => {
    while (solver.solverStack.length > 0) {
      // 中略
      const nextEmpty = solver.findNextEmpty(nextField, minEmpty)  // 変更
      console.log("nextEmpty", nextEmpty)
    }
  },
  // 中略
  findNextEmpty : (kataminoField, previousEmpty) => {
    const x = previousEmpty.x + kataminoField.slice(previousEmpty.x).findIndex(row => 
      row.some((val) => val < 0)
    )
    const y = kataminoField[x].findIndex(val => val < 0)

    return {x, y}
  },
}

以上で最小の空白マスを求めることができました。


★次回の記事

yucatio.hatenablog.com

★目次

yucatio.hatenablog.com